
Lodge Skillet (Recommended)

Cuisinart
","align":"center","text_color":"#000000"},"elements":[],"widgetType":"text-editor"},{"id":"b9dbd18","elType":"widget","settings":{"text":"Check price on Amazon","link":{"url":"https://www.amazon.com/gp/product/B004YV5Y8O/ref=as_li_ss_tl?ie=UTF8&linkCode=ll1&tag=amsamsamscooknbrown-20&linkId=dc02e1951159e69952557071c937f35a&language=en_US","is_external":"","nofollow":""},"align":"center","size":"md","typography_typography":"custom","button_text_color":"#ffffff","background_color":"#c9523a","button_background_hover_color":"#f73831"},"elements":[],"widgetType":"button"}],"isInner":false},{"id":"dae8014","elType":"column","settings":{"_column_size":33,"_inline_size":null,"border_border":"solid","border_width":{"unit":"px","top":"1","right":"1","bottom":"1","left":"1","isLinked":true},"box_shadow_box_shadow_type":"yes","box_shadow_hover_box_shadow_type":"yes","box_shadow_hover_box_shadow":{"horizontal":0,"vertical":0,"blur":10,"spread":0,"color":"rgba(12,186,0,0.5)"}},"elements":[{"id":"f495cd2","elType":"widget","settings":{"image":{"url":"https://cookandbrown.com/wp-content/uploads/2019/09/3-trophy.png","id":1128},"image_size":"custom","image_custom_dimension":{"width":"50","height":"53"},"align":"left"},"elements":[],"widgetType":"image"},{"id":"7a090ea","elType":"widget","settings":{"editor":"
Lodge Grill Pan
u00a0
","align":"center","text_color":"#000000"},"elements":[],"widgetType":"text-editor"},{"id":"41ac663","elType":"widget","settings":{"text":"Check price on Amazon","link":{"url":"https://www.amazon.com/gp/product/B00008GKDQ/ref=as_li_ss_tl?ie=UTF8&linkCode=ll1&tag=amsamsamscooknbrown-20&linkId=0e3d2b31b9793b525e3483a2ecf5f81c&language=en_US","is_external":"","nofollow":""},"align":"center","size":"md","typography_typography":"custom","button_text_color":"#ffffff","background_color":"#c9523a","button_background_hover_color":"#f73831"},"elements":[],"widgetType":"button"}],"isInner":false}],"isInner":false},{"id":"56a7d75","elType":"section","settings":[],"elements":[{"id":"e6f025e","elType":"column","settings":{"_column_size":100,"_inline_size":null},"elements":[{"id":"7291b47","elType":"widget","settings":{"editor":"Any pan will make steak. However, Conventional wisdom suggests that cast iron ones make the best steak. Could this be because cast iron skillets are great at retaining heat and they wonu2019t cool when you place the steak? The biggest advantage of cast iron skillets is that theyu2019re still hot and heavy even after being slapped with cold and wet steak. They donu2019t heat up fast but when they do, they stay that way. Whatu2019s the best tool. Perhaps the biggest consideration youu2019ll make when choosing the best skillet for steak is if it can handle high temperatures. This makes almost all non-stick skillets unsuitable for searing steak as theyu2019re rarely able to withstand more than 350 degrees Fahrenheit. While you could certainly use two skillets, youu2019re better off getting one thatu2019s oven safe too. This way you wonu2019t have t wait for the pan to pre heat.
Lodge cast iron skillet
Even though youu2019ll never sear steak on a pan thatu2019s glowing red, with this cast iron skillet youu2019re assured that it will handle all the heat you throw at it. What makes this skillet ideal? Itu2019s pre-seasoned, reliable and comes at an unbeatable price tag. When seasoning a pan, cooking oil is applied and the pan heated. This procedure is repeated serval times. With a pre-seasoned pan, you donu2019t have to do this on your own. Seasoned pans are somewhat non stick and this skillet wonu2019t lose this property as long as youu2019re cooking with it.
The panu2019s seasoning is a layer of cooking oil. If you wash it with warm soapy water, or with a dishwasher, you will have to re-season it. Not that itu2019s a big deal but re-seasoning takes time and beginners arenu2019t used to it yet.
Looking at the thick, metallic base, you wouldnu2019t expect anything short of durability and reliability firm this cast iron skillet. Under proper maintenance, this pan will last several decades. To be honest, cats iron pans are quite cheap to manufacturer. They are all made in the same way and itu2019s a surprise that some brands (Iu2019m speaking of all-clad) sell them at exorbitant prices. While brands may involve different workmanship practices when making these units, youu2019re only buying a shaped chunk of metal.
Cast iron skillets have their own downsides too. Eve though theyu2019re great at retaining heat, this is disadvantageous when youu2019re following a temperature sensitive recipe. Heat changes take long before being relayed to the food youu2019re making and this may result in overcooked foods.
Cuisinart Stainless steel pan

Cast iron skillets definitely out perform stainless steel ones when searing steak but the latter are more versatile. This skillet canu2019t take the heat and it would definitely undergo permanent deformation if you leave it on the stove for long under high heat. Unless youu2019re planning to sear steak three times a day, youu2019ll need a multipurpose skillet that gives you more value for money. Itu2019s great at making burgers, chicken, sauces, vegetables and just about anything that you can make without requiring a lid. Of course, you could
Aluminium heats up fast and loses the heat equally fast. Cast iron on the other hand is slow. Stainless steel is somewhere in the middle and almost immune to corrosion. This is a tri ply pan made in a cladding technique where two stainless steel layers sandwich an aluminum one giving it protection from corrosion and wear and tear. All clad makes use of this technique in all their cookware sets and weu2019ve compared the brand to Cusinart here. Itu2019s stainless steel interior is immune to damage and you can safely use metallic utensils on it u2013 as long as you dint do stupid things like poking it with a knife. It wonu2019t rust or corrode. However, it will slowly lose the shiny stainless steel exterior with time. Scrub it off and the glow will be restored.
The only downside of this pan is that it doesnu2019t have a non stick coating. Stainless steel skillets donu2019t require seasoning as long as you use plenty of cooking oil or sear fatty steak.
Lodge Cast iron grill pan
Do Grill pans offer more than the crispy grill lines we love? I doubt. If youu2019re more interested in getting an even crispy steak thatu2019s browned to perfection, youu2019ll gain little value from this pan. This pan makes great looking steak for sure but the taste and crispiness isnu2019t consistent. Grill pans may `not be ideal for everyone but they do make irresistible-looking steak.
What makes this grill skillet great? Itu2019s quite roomy. You can make enough steak for a medium sized family at ago without batching. Again, itu2019s a grill pan on one side and has a flat surface on the other. Flip it to make eggs and pancakes. As you would expect with grill pans, it doesn't have a handle. This makes it somewhat difficult to use.
What are cast iron skillets?
Cast iron skillets are one of the most classic kitchen tools chefs and cooks have access to. They have been around for centuries, and in fact, a cast iron skillet that is well u2013 made and well u2013 taken care of can last for decades, and even centuries. Some cast iron pans in use today have been handed down from a parent or even a grandparent, serving as testaments to their durability and their usefulness.
Cast iron skillets are made of mixed iron and steel, which are melted down and poured into a sand mold, where the mold is broken apart after the metal has cooled, allowing the metal to be formed in the shape of a skillet. Cast iron retains a lot of heat, allowing it to reach very high temperatures, and dissipates heat slowly, meaning that it retains a lot of the heat that it absorbs for a very long time, making it very useful for a lot of cooking methods. In addition, a well u2013 seasoned cast iron skillet tends to be non u2013 stick, making it easy to cook foods in the skillet, as well as very easy to clean. Last but not least, it is a very adaptable cooking utensil, which can be used over a classic gas range, on electric conduction stoves, or even used over coals or fire, or stuck into an oven. The more a cast iron skillet is used, the better it gets, as it develops seasoning layers over time, which lets it become more and more nonstick, making it easier to cook with and easier to clean. As such, it is an incredibly versatile and adaptable tool, which would serve any budding cook very well when put into their arsenal.
Why use cast iron skillets?
Cast iron skillets tend to be intimidating to a lot of people, as the association with them is that they are an advanced cooking tool. Nothing could be further from the truth. Once a cook gets used to caring for the cast iron skillet and making use of it, it will most likely become the most used pan in their kitchen, and for good reason. There are a lot of reasons why a chef may want to make use of a cast iron skillets, and here we will be listing a few of these, but note that there may be even more reasons as to why a cast iron skillet can be used.
Durability
As we earlier stated in the introduction, cast iron skillets are incredibly durable. Being made of a mix of iron and steel (though they are still referred to as cast iron), these skillets are heavy u2013 duty, and it shows on any well u2013 made pan. They tend to be a bit heavier than most pans due to the material, but this material makes it so that these pans do not wear out or break down easily. Furthermore, a well u2013 made cast iron skillet can last generations if treated well and taken care of properly, meaning that a cast iron skillet can be considered an investment, as one of these bought early on in oneu2019s cooking career will probably last the rest of their lives.
Another thing that concerns people is how the seasoning, or the layer of oil that is bonded to the surface of the pan can be made to last. A well u2013 seasoned cast iron skillet that is used often tends to develop a seasoned layer so non u2013 stick that one can even cook eggs on it without the use of oil to prevent it from sticking to the pan, one of the attributes that makes these pans so attractive. However, a lot of people worry about how to maintain the seasoning. A lot of the time, the seasoning of a pan is more durable than people think. As long as one does not scrub it off too roughly, especially if they use metal instruments, then the seasoning will most likely last and improve over time.
Versatility
A cast iron skillet is one of the most versatile cooking implements a chef can have in their kitchen. While most other cooking implements are really specialized, such as non u2013 stick pans being made to be used over a gas range, a cast iron skillet can be used to cook a wide variety of things, and through a wide variety of methods. As stated earlier, cast iron skillets can be used on gas ranges, electric stoves, over open flames or coals, or even in ovens. This means that no matter what type of heat source one is making use of, the cast iron skillet can most likely be used with it, as compared to the limitations of more modern pots and pans, where they are not rated to be used in other heat sources than the ones that they were specifically designed and marketed for.
Cast iron skillets also allow one to cook a variety of dishes. Its qualities of absorbing and maintaining high levels of heat allow for a large amount of versatility in cooking. It can be used to saute, to sear, or even to stew or bake. Thus, cast iron skillets are often used for one u2013 pot dishes, where a dish is cooked entirely in one cooking utensil, even though it may go through multiple stages. For example, if one wishes to stew some meat, they can saute the aromatics in the skillet, then sear the meat in the skillet, then cover it with broth and place it in the oven to cook the rest of the way. This allows for much less cleanup, and requires much less cooking utensils as compared to replicating the same recipe using different pots and pans.
Great cooking results
One of the main reasons people make use of cast iron skillets is due to their capability of absorbing and retaining high amounts of heat, and having that heat be distributed along the pan in a very even manner. This means that one can cook with better results, as there is less likely to be a spot where the heat is concentrated, as well as the fact that as it retains heat so well, adding additional ingredients will not immediately lower the heat level of the pan, which makes adjusting and compensating the heat source far easier and far more effective.
In addition, the even spread of the pan means that it cooks things evenly, which is not only useful for cooking regular dishes, but also for baking and other types of dishes such as stews. When baking, it is important that the whole thing is cooked at a uniform rate, unless one would want a strangely cooked dish. A cast iron skillet solves most of those problems, as it spreads heat far better as compared to oneu2019s ordinary baking dish or pasta pot, which makes it much easier to use, and often returns with better results.
In addition to the fact that it retains and absorbs heat so well, the fact that it becomes nonstick due to its seasoning, which is a polymerized layer of fats (usually cooking oils baked into the pan and the oils that bond to it over time), makes it much easier to cook with. Though it does tend to reach high temperatures, one is less likely to burn food on it, as the food does not stick, and one can avoid getting mangled burnt food, as they can easily be detached and flipped from the pan. This non u2013 stick quality also makes it very easy to clean, as it can simply be submerged in warm water and the bits scraped off with polycarbonate tool or even wiped off with a paper towel.
What to watch out for when cooking in cast iron skillets
Though cast iron skillets are incredibly durable and versatile, there are still some things that shouldnu2019t be cooked in them for various reasons. The cast iron skillet can cook almost anything, but not everything, because they might harm the pan or its seasoning, and the dish may not come out the way one wants it to.u00a0
Acidic Foods
Acidic foods such as foods that contain tomatoes, or even tomato sauce itself should not be cooked in your cast iron skillet. The acidity of the food can end up damaging the seasoning of the skillet, and while a skillet can always be re u2013 seasoned, it may undo a lot of cookingu2019s worth of layers of seasoning, and one will have to start building up the seasoning again. In addition, due to the damage done to the seasoning, the food that is cooked may taste a bit metallic, due to the acidity chipping away at the seasoning and thus hurting its taste. This means for some classic dishes such as spaghetti Bolognese, it may be better to stick to the stainless steel type skillets instead, in order to avoid doing damage to oneu2019s beloved cast iron.
Wine u2013 Braised Food
One cooking technique that is popular is deglazing the bottom of the pan with wine or vinegar, in order to release the bits that are stuck at the bottom and improve the flavor depth of the dish. However, wine can break down the seasoning of a skillet as well, so before one makes use of this technique, they have to make sure that the pan is well u2013 seasoned before they do it, and they have to make sure to season the cast iron skillet again after, to ensure that whatever layers that may have been broken down will be restored.
Desserts
While cast iron skillets can be used for baking, and in fact are sometimes the primary tools for baking some desserts, one should take care when using the skillet to bake desserts. One of the best things about a cast iron skillet, that it retains a certain amount of u201cflavoru201d after cooking foods, can work against it in this case. If a skillet is used most often in order to cook savory foods, it can sometimes keep that flavor and end up influencing the dishes cooked after it. Cooking desserts in a cast iron skillet that has most often been used to cook savory dishes may end up having the desserts taste different, with a certain savory flavor imparted onto it, which changes the dish entirely and will probably be something that the cook wants to avoid. As such, it is better to have separate cast iron skillets when one cooks savory food and when one uses it to bake desserts.
Delicate Fish
While cast iron skillets are very non u2013 stick, there will still be times when some things stick to the bottom of the pan. These are often easily cleaned off, but this also means that the food that is being cooked might not turn out the way one wants it to. Some foods, such as the more delicate fish varieties, may not be well u2013 suited for the high temperatures cast iron skillets reach. Fish such as tilapia or flounder may stick to the pan, and this may ruin the presentation of the food. In addition, a lot of the time, people cook with metal utensils, meaning that when one tries to flip over the fish and scrape it off the pan, they are using a metal spatula, and the action of metal scraping on the pan may damage the seasoning of the pan, lessening the seasoning and the non u2013 stick nature of the cast iron.
How to choose the best cast iron skillet for you
If you are interested in getting a cast iron skillet for your home kitchen, and no one would blame you, it would be tempting to head out right now to the nearest cooking store and pick one up for yourself. However, before you do that, there are still some things that you should know in order to make the proper choice as to what kind of cast iron skillet youu2019ll be taking home, in order to make sure it suits your needs and lasts you a lifetime. Here we will be discussing some of the things that a buyer should keep an eye out for when choosing the cast iron skillet that they will purchase.
Size
Cooking utensils come in a variety of sizes, and cast iron skillets are no different. There are a large variety of sizes that cast iron skillets come in, but they usually come in four different size points: eight inches, nine inches, ten inches, and twelve inches. An eight inch skillet is good for cooking for two, as it can cook about two chicken thighs or a standard eight ounce steak, and it can be well u2013 suited for cooking vegetables, as its small size lets it easily flip the food that it contains. However, the small size, while making it easier to wield, also means less food can be cooked, so an eight inch skillet is best used for preparing side dishes, or if used for main courses, is best for when the main course is meant to feed one or two people only. A nine inch skillet is similar in function to the eight inch skillet, but the additional inch to its diameter means that it can cook foods that can serve up to three people, maybe four depending on the serving size. When it comes to steak, one of the classic cast iron skillet dishes, it will comfortably fit a twelve ounce steak.
A ten inch skillet is the most conventional one, as it comes the closest to regular pan sizes, as well as replicating popular baking pan sizes as well, making it very versatile in terms of what it can cook and how easy it is for the cook to modify their recipe to suit the pan. It can fit an extra large ribeye steak,u00a0 or even two large chicken breasts, meaning it can cook enough food at once for a larger amount of people, about three to four servings for the pan.
A twelve inch pan is meant for family u2013 size servings, as it is very heavy and hard to wield, especially if one has become accustomed to flipping food using the pan. However, its size means that it can cook a lot of food, and will be one of the staples in the kitchen when it comes to preparing food, as it is well suited to simply leaving on the counter and cooking with whenever it is needed.
Shape
There are different kinds of cast iron skillets, each with their own purpose. There are generally two types of cast iron skillets that are often seen in the market today: regular, conventional round pans, and griddle pans. Round pans are more versatile, in that they are often used for any dish, and can indeed be used for most dishes, whether it be fried foods, stews, or even baked foods. This would be the right choice if you intend for your cast u2013 iron skillet to be adaptable, or if you are buying one for general use, rather than having a specific type of dish in mind. Griddle pans on the other hand, are pans that can be round or square, but have ridges, where the ribbed surface is better meant for meats. The ribbed surface allows the fats and oils to drain better, as well as allows the meat that is cooked on it to have the criss u2013 cross pattern that is found to be appetizing and attractive. It also allows meat to be seared better as the space in the gaps between the ridges allow the steam to escape, rather than trapping it beneath the meat, making sure that the moisture will not build up, and giving the meat a better seared crust. However, this also means that cook time may take longer, as the meat is only coming into contact with the ridges, and as such, one will have to adjust to longer cooking times. In addition, this also means that cooking with a griddle pan gives one less options, as it may not be suited to cooking some foods such as stews, or for baking desserts.u00a0
Brand
Most cast iron skillets on the market today are from popular brands such as Lodge, and these can be very inexpensive. Being relatively cheap does not necessarily mean that they are low quality, and a lot of inexpensive cast iron skillets can still last multiple generations. However, one has to make sure that they are buying a reputable brand, as well as find out what kind of skillets that brand is known to make. For example, if one wishes to by an antique skillet, such as a Griswold skillet, that brand is well known to have thinner, lighter bottoms, allowing it to heat up much quicker and is easier to handle, but at the trade off of having lower heat retention. In addition, each brand may have different methods of making the skillet: the aforementioned Griswold skillets have very smooth surfaces due to the manufacturing methods, and Lodge skillets tend to have rougher surfaces due to fine sand molding being banned for safety reasons. Doing oneu2019s research into their skillet brands can help one make a better, more informed decision. After all, one wants their skillet to last a lifetime or even more, so making sure that they are buying a reputable, trustworthy skillet is very important to getting one set on the journey of using cast iron.
Types of Steak
Choosing the type of steak is one of the most important factors to consider when buying the perfect steak for your meal.u00a0 There are many different types of steak and picking the right one will depend on your budget, what you want to do with it and how many people you are serving.u00a0
The most common types of steak are Rib eye, Strip, T Bone and Sirloin, but there are other steak types to consider as well.u00a0 Below is a description of each type of steak.
Rib Eye u2013 Rib eye steaks, sometimes referred to as the Delmonico, are known for their marbling.u00a0 Rib eyes are a popular choice because they have marbling throughout the steak and the result is a very tasty and tender steak.u00a0 Another reason that the rib eye is a popular steak is because they are typically one of the most affordable when it comes to steak options.u00a0 Rib eyes can be cut with a bone or be boneless.u00a0
Strip u2013 The Strip is also known as the top loin steak and is another popular choice.u00a0 Strip steaks are cut from the loin, have less marbling than a Rib eye but are still a very tasty steak.u00a0 Strips can be cut thick and are often priced slightly higher than a Rib eye.u00a0 Strips can have a bone or be boneless.
T-Bone u2013 T-Bones steaks are actually two steaks in one that are separated by a t-shaped bone.u00a0 The larger piece of meat is a strip and the smaller piece on the other side of the bone is a tenderloin.u00a0 T-Bones are typically more expensive because they contain two of the higher priced cuts of meat u2013 a strip and a tenderloin.u00a0 However, in grocery stores, you may find them at a fair price overall because the steaks are often sold in sizes much smaller than what youu2019d find at a steakhouse.u00a0
u00a0Porterhouse u2013 A Porterhouse is similar to a T-Bone but it is cut with a larger filet.
Sirloin u2013 Sirloins are a tougher steak and consists of many different cuts of meat.u00a0 For steak, Top Sirloins make a better choice whereas other parts of the sirloin are better used as roasts.u00a0 Sirloins are lower in price.
Flank Steak (often referred to as London Broil) is cut from the bottom of the cow and is a tougher meat.u00a0 London Broil is not the actual name of a cut but rather a method of cooking.u00a0 These steaks are best when grilled and then cut into thin strips, across the grain. Flank steak is used for fajitas.
Round Steak u2013 Round steaks are tough and do not yield great results when grilled. These steaks are better used when cooked slowly with liquid that helps to tenderize the meat.
Flat Iron or Top Blade Steak u2013 Believe it or not, this is a newly created steak developed not by evolution, but by better cutting techniques.u00a0 It is uniform in shape and has plenty of marbling so itu2019s a great steak for grilling.u00a0
Chuck Steak u2013 Chuck Steak is a low cost version of a rib eye.u00a0 The chuck is a decent steak but it can dry out quickly.u00a0
Filet Mignon u2013 The filet is an expensive cut of meat.u00a0 It is tender but it does lack marbling so it is often cooked while wrapped in bacon.u00a0 As the steak cooks, the fat from the bacon will help to provide flavor to the steak.
The Right Steak for Your Occasionu00a0
So, now that your head is full of all of this information, youu2019re probably still asking yourself, u201cHow do I pick the perfect steak?u201d The section below describes the most common events where steak is served and the steaks that work well on those occasions.
Everyday Cooking
Rib Eyes, Sirloins and Strip Steaks are great for everyday cooking.u00a0 A few of these steaks, mix or match, will please everyone in the family.u00a0Sirloins are the most economical in price and the top sirloin is the best bet in the sirloin family.u00a0 Rib eyes are known to be the steak of choice since the marbling creates a very juicy and flavorful meat.u00a0 Plus, rib eyes are also moderately priced.u00a0 Strips are a bit pricier than rib eyes but are a good choice because they are tender and cut to the perfect size.u00a0
All three steaks of these steaks possess inherent flavor so, as you will see in the seasoning section, there is not a lot of other work needed to create the perfect steak from these types.
Backyard BBQ
For a large crowd, sirloins will do the trick.u00a0 They are economically priced and produce a very good flavor.u00a0 If it is a smaller crowd you can turn it up a notch with Rib Eyes.u00a0
Dinner Party
With a small gathering, a boneless strip steak is perfect.u00a0 Boneless strips offer a great, flavor and you can impress your visitors by offering a very tender steak.u00a0 Strips are also the perfect size for entertaining as they are typically cut in a 10-12 ounce size.u00a0 Add a baked potato and vegetable and you have a perfect meal for entertaining close friends or family members.
Elegant Dining
For those special occasions a Filet Mignon is the perfect choice.u00a0 Filets are the most tender of them all to the point where they melt in your mouth.u00a0 You will pay for this because filets are expensive because the supply is low.u00a0 The filet is cut from a very small muscle that is rarely used.u00a0 This is the reason why they are so tender.u00a0
T-Bones and Porterhouses are also excellent choices for a special evening.u00a0u00a0 These steaks are actually two steaks in one, separated by that familiar T-Bone.u00a0 On one side you have the tender filet and on the other, the strip.u00a0 The Porterhouse is similar to a T-Bone but cut with a larger filet.
Large Gathering
Since steak is a pricey meal, Sirloin is a great choice for a large gathering.u00a0 Sirloins are economical in price and they produce a great steak sure to please everyone.u00a0
Tailgate
Rib Eyes are ideal for a tailgate party.u00a0 The marbling will create that great flavor that everyone loves.
Thickness of Your Steak
After choosing your steak and insisting on the right grade, the thickness of a steak plays a prominent role when it comes to the cooking process and the results.u00a0 Obviously, a steak that is thin will cook very quickly while a thicker steak will take longer to cook.u00a0
A good thickness for a steak is one and a quarter to one and a half inches in thickness.u00a0 Avoid steak cuts that are thinner than an inch.u00a0 A steak that is an inch or less in thickness leaves little margin for error as it is prone to over cooking.u00a0
Because the steak is thinner, the heat from the searing process will cook the inside more quickly.u00a0 It is more challenging with thin steaks to accomplish the perfect level of pink in the middle or tenderness that most steak lovers desire.
On the other hand, a steak that is two inches or thicker will be prone to undercooking.u00a0 The outside will be done but there is a good chance the middle of that steak will still be red.u00a0 People that like rare or medium rare may enjoy thicker steaks, but for the great majority of steak lovers, a steak that is very thick will affect the overall quality of the steak once cooked.
Supermarkets typically sell their pre-package steaks with thickness less than one inch and closer to three quarters of an inch.u00a0u00a0 Warehouses and specialty markets typically package their steaks with a thicker cut.u00a0u00a0 Just ask the onsite butcher to cut your steaks to your specification.u00a0 It may cost a bit more than the pre-packaged offerings, but you will get better results.
u00a0Quick Summary of Best Practices for Buying the Perfect Steak
In summary, when you go to buy your steak, you should not take short cuts.u00a0 First, insist on shopping for your steak at a store that is known for having a fresh supply and a wide variety of steaks.u00a0 Second, before you get to the store, decide on the type of steak you want for your meal.u00a0 And third, keep these best practices in mind:
- u00a0Buy the best grade that you can afford.u00a0 Prime is very pricey but cuts in the Choice and Select group still produce a great steak.
- Look for steaks that are bright red in color, have marbling throughout and are firm to the touch. Avoid deep red colored steak and clumpy marbling.
- Buy from the butcheru2019s case instead of the pre-packaged meat case.u00a0 Steaks cut by butcher are typically fresher and of better quality.u00a0
- Take Advantage of Your Local Butcher and his expertise.u00a0u00a0 Remember that most grocery stores have an onsite butcher but very few customers take advantage of their expertise.u00a0 The butcher can answer any questions you may have, offer tips and cut steaks to your exact specifications.Now that you have your steak, letu2019s discuss steak preparation!
Steak Preparation for Perfection
There are really three essential steps to steak preparation: steak temperature, drying the steak and seasoning.
Temperature of Steak Prior to Cooking
The first key factor in the steak preparation process and a secret key to cooking a great tasting steak is to bring the steak to room temperature before cooking. u00a0Many people do not do this but, believe me; this makes a huge difference because it optimizes the cooking process.u00a0
In order to do so, you want to take the meat out of the refrigerator at least thirty minutes before cooking.u00a0 Obviously, if the steak is thicker you may need more time.u00a0 Doing so will help the meat cook evenly during the cooking process and allow you to achieve better results cooking the meat to the desired doneness.u00a0
Steak cooks best on high heat.u00a0 The heat will sear the outside and seal in the juices.u00a0u00a0 If a steak is cold when put on the grill, the outside of the steak may look done but the inside could still be too red or pink for your liking.u00a0
Drying the Steak
Another key element to the perfect steak is to pat dry the steak with paper towels prior to seasoning and cooking.u00a0 Many cooks skip this step.u00a0 It only take a few minutes but doing so will create a dryer surface on the steak.u00a0 A dryer surface will help to achieve the highly desired exterior crust on the outside of the steak when cooking.u00a0 Conversely, a steak with a wet surface may cause the steak to steam which is not desired.
While you are waiting for your steaks to get to room temperature, you can work on the other dishes that you plan on serving with your steak.u00a0 You can also use this time to turn on the heat source or light the grill.u00a0 If you are grilling or broiling your steak you should give the grill or oven about 15-20 minutes to get hot enough to start cooking.
Seasoning
The best seasoning really depends on the type of steak. This section will be split into two parts.u00a0 The first is seasoning a steak such as a Rib eye, T Bone, Strip, Filet or Sirloin that you can just season with dry spices and cook it.u00a0
The second section deals with steaks that work better with a marinade which consists of wet and dry ingredients.u00a0 Of course, you can marinate any type of meat.u00a0 Just follow the directions for the marinade (particularly the length of the time needed).
If you purchased a good steak using the factors noted above, there is very little seasoning needed because the marbling (i.e. fat) will break down during the cooking process and make its way through the meat.u00a0
In other words, if cooked properly, the heat liquefies the fat and the fat makes its way throughout the steak.u00a0 This process cannot be beat when it comes to ideal steak flavoring.u00a0 This is why a steak with more marbling throughout it will have more taste than one with less marbling or one with marbling that is not evenly distributed.u00a0
Put simply, if youu2019ve bought a good quality steak, all you need is salt and pepper.u00a0 As the fat melts it will carry the seasoning throughout the steak.u00a0 So, simple salt and pepper works well.u00a0 In fact, including too much seasoning or introducing other types of seasonings can actually negatively affect the flavoring.
When it comes to salt, I recommend kosher or sea salt to bring out the best flavoring in the steak.u00a0 If you donu2019t have either of these, table salt will work well also.u00a0 Some chefs claim that salt inhibits the ability to sear the steak, which is a key component in cooking a juicy steak.u00a0 However there are others that refute this notion.u00a0 As with anything, moderation is key.u00a0
For pepper, the best method is to use a pepper grinder.u00a0 Pre-packaged pepper tends to lose its flavor during the cooking process.u00a0 Freshly ground pepper will maintain its flavor much better as the meat cooks.
My research has shown that the great majority of people like their steak best in its natural state with minimal spices added because other types of spices can compete with the steaku2019s natural flavoring.u00a0 However, there are numerous commercially made steak spice mixes available which offer a different steak experience.u00a0
Most of these can be found in any supermarket in the spice aisle.u00a0 You may find more exotic flavors in specialty markets.u00a0 You do need to be careful because many will actually create a fake or processed taste.u00a0 Insist on a high quality spice.u00a0
I like my steak au natural, but every now and then, for something different, I will use an additional spice.u00a0 One of the most popular brands of spices is Montreal Steak Seasoning.u00a0 Their spice product work with the natural flavoring of steak.
u00a0In addition to salt and pepper, Montreal Steak Seasoning also includes dill, garlic, coriander and red pepper.u00a0
If you are going to use a spice or dry rub, the steaks that do best for this include: Filet Mignon, Strip, Porterhouse, Rib eye, Sirloin, T-bone, and Tenderloin.
Marinades
A marinade is a combination of wet and dry ingredients.u00a0 Commonly used wet ingredients include Worcestershire, teriyaki or soy sauce, wine, olive oil, lemon or lime juice.u00a0 When combined with dry spices such as salt and pepper and garlic or ginger marinades help to add flavor and increase the tenderness of the steak.u00a0u00a0u00a0 Marinades work great with tougher cuts of meat such as round, skirt, flank and chuck.u00a0 They can also be used with rib eyes, strips and t bones.u00a0
Whatever ingredients you use, be sure to follow the instructions in your recipe.u00a0 The time needed to marinade depends on the cut of steak.u00a0 Tougher steaks need longer marinating times while more tender cuts may need as little as fifteen minutes to a few hours.u00a0 Be sure to pat dry the steak with paper towels prior to cooking it.u00a0
Steak Sauces
Just like spices, there are many commercially produced steak sauces available at most supermarkets.u00a0 While the marketers would make you believe that eating a steak with steak sauce is essential, most steak experts and true steak lovers will scoff at the notion of using such a thing.u00a0
Buy a good quality steak, prep it properly, season it lightly and cook it the right way and you wonu2019t need to add any flavor. u00a0u00a0Itu2019s like that old saying goes, u201cYou canu2019t screw up a good steak!u201d
Oil or Butter
Some recipes will instruct you to coat the steak in melted butter or oil prior to cooking and seasoning.u00a0 This may be helpful with a less tender steak.u00a0 However, with tender steaks the added cooking agent will negatively impact the texture of the steak and not achieve the desired results. u00a0The goal of this is usually to seal the outer layer.u00a0 But, a dry outside is the better approach to create the crust on the exterior of the meat. u00a0Since a tender steak will have plenty of marbling, it will create its own oil.u00a0 There is no need to add oil or butter.u00a0 Doing so also makes the food more unhealthy.
STEP THREE: Pre-Cooking Checklist
Before we get into the actual steps for cooking the perfect steak, I wanted to talk about three additional things that make a big difference in your cooking success:u00a0 searing, flipping, and doneness.
Searing
With every cooking method, you will want to sear the steak as the first step.u00a0 Searing a steak seals in the juices which makes a huge difference in the cooking process.u00a0
Plus, searing also gives steak that great crusty surface on the exterior. Combine that with a juicy and tender inside and you have yourself a masterpiece!
When it comes to searing, a clean cooking surface is key because you donu2019t want anything in between the steak and the heat.u00a0 With a grill, you accomplish this by always making sure your grill surfaces are clean.u00a0 If you are using a pan to sear the meat you can add some oil.u00a0 Be sure to use vegetable oil since it will stand up to higher temperatures.u00a0
You need to make sure the surface is hot enough before putting the meat in.u00a0 Watch the temperature though.u00a0 If it gets too hot, charring will occur as the meat begins to break down and leaves you with bits of carbon.u00a0 Charring is not desired as it not only tastes bad but is bad for you as well.
As you will see below, the specific process for searing depends on the cooking method. u00a0For now, I wanted to emphasize searing because making sure it is done properly ensures a much better tasting steak.
Flipping A Steak
As you will see with each cooking method, a steak needs to be flipped throughout the cooking process to ensure even cooking throughout the steak.
The secret to flipping is to always use tongs when flipping a steak.u00a0 Using a fork may pierce the exterior and this allows the juices to escape.u00a0 As noted, it is essential to keep as much juice flowing inside the steak as possible.u00a0
Also, you also donu2019t want to press down on a steak as that will also press juices out while it is cooking.
If you need to check for doneness, use an instant read thermometer.u00a0 An instant read thermometer is a worthy investment since it will provide you with the internal temperature of the meat without affecting the cooking process.u00a0 If you do not have one, then cut a small piece off of the steak to check.u00a0 Avoid piercing at all costs.
u00a0Determining Doneness Ahead of Time
The term u201cDonenessu201d refers to how cooked the steak is.u00a0 The terms range from u201cRawu201d, or uncooked, to u201cOvercookedu201d.u00a0 There is no ideal doneness level.u00a0 It totally depends on the eater and his or her preferences.u00a0 Steak lovers come at all levels.
Having said this, the doneness level significantly affects a personu2019s satisfaction with his or her steak.u00a0 Accordingly, always ask the people who you are cooking for what their desired doneness is.u00a0 And, do this prior to starting the cooking process.u00a0
STEP FOUR: COOKING THE PERFECT STEAK
Okay, now that you understand the importance of searing, you have proper tongs for flipping and you have determined the doneness you need for each piece of steak you have, it is time to cook!
There are four main ways to cook a steak u2013 Grilling, Broiling, Roasting and Pan-Frying. Hands down, grilling will yield the best results due to the high direct heat.u00a0 If you have access to a grill, either charcoal or gas, you should always grill the steak.u00a0
For those that donu2019t have access to a grill you can still get great results by broiling, roasting or pan frying your steak. Each method is discussed below.
Tip:u00a0 No matter what method of cooking you choose, do not crowd the steaks on the cooking surface.u00a0 Make sure there is enough space between each piece of meat.u00a0 Cooking steaks too close to each other or touching each other may result in steaming the meat and you wonu2019t achieve the ideal searing result.
Grilling
Using a grill to cook a steak is the preferred method because the grill produces the high heat that will sear the side of the meat which creates the desired crust and locks in the juices.u00a0 A grill also requires less clean up.u00a0 Using a gas grill or a charcoal grill will give you great results.u00a0
Between the two types of grills, most experts believe that a charcoal grill will provide a more authentic, smoky flavor.u00a0 A charcoal grill will also achieve the hot temperature without a cover.u00a0 The downsides of a charcoal grill include the time needed to build the fire, no shut off button and the ash waste left over from the burnt charcoal.u00a0
Gas grills are the most common because of their convenience.u00a0 I use my gas grill and get phenomenal results.u00a0u00a0 When gas grills first came to market they were pretty simple with a few knobs and burners and a small cooking area.u00a0 Now they come in all shapes and sizes with many different features.u00a0 A gas grill with a large cooking surface and multiple burners (at least 4) is ideal because you can create cooking zones that have different temperatures needed to sear and then finish the cooking.u00a0
But if you only have a basic grill without this feature, it is not necessary; just make sure you reduce the temperature after searing.u00a0
Gas grills are much more convenient because it takes less time (and materials u2013 no lighter fluid) to light and they can be shut off by turning a few knobs.u00a0 Gas grills also produce very little waste.
The one downside of a gas grill is the lack of smoky flavor that a charcoal grill provides.u00a0 Gas grills also operate best when the cover is closed because this allows the temperature to remain high.u00a0 But, watch out because leaving the cover on too long can increase the likelihood of charring.u00a0
Below is a step by step approach to grill a steak with either a charcoal or gas grill.
Charcoal Grill
Step 1 u2013 Build a two level fire by spreading coals in a single layer over one half of the grill. In the other half, pile the coals up so they are 2-3 inches away from the cooking surface.u00a0 This side of the grill will be hotter and used for searing the meat.u00a0 The other side will be used to finish the cooking.
Step 2 u2013 Place the grill rack on the grill and put on the cover.u00a0 Allow 5-7 minutes for the rack to heat up.
Step 3 u2013 Place seasoned steaks on the higher level of the grill and cook on each side for 2-3 minutes or until well-browned.u00a0 (Move the steaks to the cooler side if flaming occurs.u00a0 Use a squirt bottle to put out the flame.)
Step 4 u2013 After the searing process, move the steaks to the cooler side to finish the cooking.u00a0 Refer to the cooking times chart in the Appendix for the amount of time required based on type of steak, thickness and doneness you desire...u00a0 Be sure to flip the steak halfway through for even cooking.
Step 5 u2013 Transfer the meat to a platter when done (and go to Step 5 of the Five Step Formula).
Gas Grill
Step 1 u2013 Turn on the grill and pre-heat the grill with all dials at the highest setting. Be sure to have the lid down. Let the grill pre-heat for about 15 minutes.
Step 2 u2013 Keep one side of the grill at the maximum heat level and turn the burner(s) on the other side to medium.u00a0 This will create the cooking zones needed to sear and finish the cooking.
Step 3 u2013 Place steak on the hot side, close the lid and grill on each side for 2-3 minutes or until well browned (searing).u00a0
Step 4 u2013 Move the steaks to the cooler side to finish the cooking.u00a0 If you have a grill which does not allow for multiple cooking zones, you will need to lower the heat at this point to medium or medium high (for higher doneness levels). Refer to the cooking times chart in the Appendix for the amount of time required based on type of steak, thickness and doneness you desire.u00a0 Be sure to flip the steak halfway through for even cooking.
Step 5 u2013 Transfer the meat to a platter when done (and go to Step 5 of the Five Step Formula).
Broiling
A broiler is like an upside down grill and is a second best alternative for cooking a steak if you do not have a grill.u00a0 A broiler is also a good option if the weather has turned colder since a grill may not get hot enough to properly cook the steak.u00a0 This is more of an issue with gas grills. A word of warning u2013 The broiler may produce a lot of smoke so you may want to open a window and your smoke alarm will probably go off.
Step 1 u2013 Position the oven rack so that it is 4-6 inches away from the broiler.u00a0 For thinner steaks put it closer, and for thicker steaks position it further away.u00a0 Pre-heat the broiler AND heat the broiler pan.u00a0u00a0 By heating the broiler pan, this creates the hot cooking surface needed for searing (we discussed earlier.)
Step 2 u2013 Once heated to broil levels, place the seasoned steak on the broiler pan.u00a0 Refer to the cooking chart in the Appendix to determine how long to cook the steak.u00a0 Turn the steak mid way through the cooking time.u00a0
IMPORTANT:u00a0 If the steak begins to burn or char, move the steak further away from the broiler by adjusting the oven racks.u00a0 With broiling, this positioning adjustment is what makes it different than roasting.
Step 3 u2013 Remove the steak from the oven and transfer it to a platter. Go to Step 5 of the Five Step Formula.
Roasting
Roasting a steak is a two step process.u00a0 It is also a great way to cook a steak without a grill.
Step 1 u2013 Pre heat the oven to 450 degrees.u00a0u00a0
Step 2- Put a heavy frying pan (cast iron if you have one) on a stove burner and heat to medium-high.u00a0
Step 3 u2013 Add enough oil to lightly cover the pan.u00a0 Place the seasoned steak in the pan and cook for 2-3 minutes or until well browned.u00a0 Flip the steak and cook the other side for 2-3 minutes or until well-browned. This is the searing process.
Step 4 u2013 Transfer the steak to a cooking sheet.u00a0 Refer to the cooking chart in the Appendix for cooking times.u00a0 Be sure to flip the steak half way through.
Step 5 - Transfer the meat to a platter and go to Step 5 of the Five Step Formula.
Pan Frying
Pan frying is a great way to cook more tender and lean cuts of steak such as filets, sirloins and strips.u00a0 With pan frying, the temperature isnu2019t as high as broiling so you can cook each side just once, flipping half way through.u00a0
A nice bi-product of pan frying are the juices left behind after cooking that can be used to make sauces that you can serve with your steak.
Be sure to use a splatter screen when pan frying because the heat and oil can make a mess.u00a0 Boneless steaks work better for pan frying because the meat will touch the pan.u00a0 if you are cooking a steak with a bone, it is difficult to properly sear a bone in steak when pan frying.u00a0
Step 1 u2013 Put a heavy frying pan (cast iron if you have it) on a burner and turn the burner on to medium-high.u00a0 Add enough oil to coat the bottom of the pan. The oil is what is required to sear the steak once the steak is put into the pan
Step 2 u2013 Place the seasoned steak on the pan and cook the steak.u00a0 Refer to the cooking chart n the Appendix to determine the total cooking time.u00a0 At the halfway point, flip the steak and cook on the other side.
Step 3 u2013 Remove the steak from the pan and transfer to a platter.u00a0 Go to Step 5 of the Five Step Formula.
STEP FIVE: The Final Secret Step
So, the cooking is about complete and you canu2019t wait to dig in.u00a0 Your family or guests are drooling over the smell.u00a0 Neighbors are ready to knock down your door because theyu2019ve been forced to inhale the beautiful, distinctive aroma of a steak cooking.
This is where you need to step back and take control.u00a0 This last step is one that most people overlook.u00a0
As a final secret step, you must give the steak time to REST before slicing.u00a0 I repeat, that this is a must do before not just eating the steak, but slicing the steak.
What does it mean to let your meat rest?u00a0 Well, think about it for a second.u00a0 The cold (room temperature) slab of meat you started with was just subject to torture for the last 10-15 minutes.u00a0
It was immediately exposed to heat close to 500 degrees.u00a0 Then it was flipped around a few times.u00a0 The solid fat has been melted and distributed throughout.u00a0u00a0 Once it is done cooking, the steak needs a bit of time to adjust before you can slice into it.u00a0 This is called letting the meat rest.u00a0
When a steak cooks, the juices of the meat move away from the outside towards the middle.u00a0 When the steak is flipped, the same thing happens on the other side. u00a0As a result, the middle is full of juice while the steak is cooking.u00a0
If the steak is removed and cut into immediately at that point, the juice will pour out of the middle of it leaving a lot of flavor on your cutting board or platter.u00a0 Youu2019ve probably seen this before: a steak on a platter or plate with juices all over the place.u00a0u00a0
High end steak restaurants insist on this last step.u00a0 This is often why a steak dinner ordered will take longer to get to the table.
u00a0The resting allows the juices to redistribute throughout the meat from the center back into the edges. And this does affect the taste of the steak! In addition to the juice retention, a steak will continue to cook some after you remove it from the heat source.
u00a0During this time you can finalize the preparations for the rest of the menu.u00a0
The steak resting process is pretty simple.u00a0
- Once the steak has finished cooking, use your tongs (never a fork) to place the steak on a platter.
- Cover the platter tightly with the aluminum foil.
- Let the steak rest inside the aluminum foil cover before cutting.
How long the steak rests depends on the thickness, but it should be at least 5 minutes.u00a0 If the steak is thicker you probably want to let it rest for a few more minutes but no more than 10 minutes or the steak will start to get cold.u00a0
Now your steak is ready for the table.u00a0 If you are cooking a number of steaks for a crowd you may want to cut them into smaller pieces at this time.u00a0 If each person eating will get his or her own steak then you can place the entire steak on their plate!
With this last step of steak resting, you will have accomplished the perfectly cooked steak!
","text_color":"#000000"},"elements":[],"widgetType":"text-editor"}],"isInner":false}],"isInner":false}]
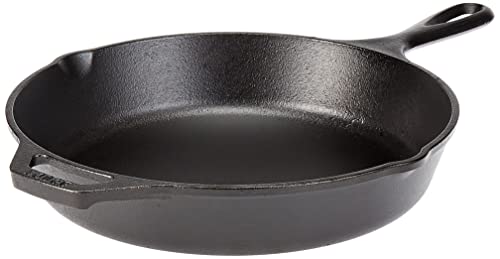
Lodge Skillet (Recommended)

Cuisinart

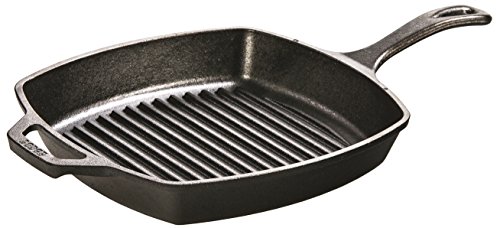
Lodge Grill Pan
Any pan will make steak. However, Conventional wisdom suggests that cast iron ones make the best steak. Could this be because cast iron skillets are great at retaining heat and they won’t cool when you place the steak? The biggest advantage of cast iron skillets is that they’re still hot and heavy even after being slapped with cold and wet steak. They don’t heat up fast but when they do, they stay that way. What’s the best tool. Perhaps the biggest consideration you’ll make when choosing the best skillet for steak is if it can handle high temperatures. This makes almost all non-stick skillets unsuitable for searing steak as they’re rarely able to withstand more than 350 degrees Fahrenheit. While you could certainly use two skillets, you’re better off getting one that’s oven safe too. This way you won’t have t wait for the pan to pre heat.
-
Lodge cast iron skillet
Even though you’ll never sear steak on a pan that’s glowing red, with this cast iron skillet you’re assured that it will handle all the heat you throw at it. What makes this skillet ideal? It’s pre-seasoned, reliable and comes at an unbeatable price tag. When seasoning a pan, cooking oil is applied and the pan heated. This procedure is repeated serval times. With a pre-seasoned pan, you don’t have to do this on your own. Seasoned pans are somewhat non stick and this skillet won’t lose this property as long as you’re cooking with it.
The pan’s seasoning is a layer of cooking oil. If you wash it with warm soapy water, or with a dishwasher, you will have to re-season it. Not that it’s a big deal but re-seasoning takes time and beginners aren’t used to it yet.
Looking at the thick, metallic base, you wouldn’t expect anything short of durability and reliability firm this cast iron skillet. Under proper maintenance, this pan will last several decades. To be honest, cats iron pans are quite cheap to manufacturer. They are all made in the same way and it’s a surprise that some brands (I’m speaking of all-clad) sell them at exorbitant prices. While brands may involve different workmanship practices when making these units, you’re only buying a shaped chunk of metal.
Cast iron skillets have their own downsides too. Eve though they’re great at retaining heat, this is disadvantageous when you’re following a temperature sensitive recipe. Heat changes take long before being relayed to the food you’re making and this may result in overcooked foods.
-
Cuisinart Stainless steel pan
Cast iron skillets definitely out perform stainless steel ones when searing steak but the latter are more versatile. This skillet can’t take the heat and it would definitely undergo permanent deformation if you leave it on the stove for long under high heat. Unless you’re planning to sear steak three times a day, you’ll need a multipurpose skillet that gives you more value for money. It’s great at making burgers, chicken, sauces, vegetables and just about anything that you can make without requiring a lid. Of course, you could
Aluminium heats up fast and loses the heat equally fast. Cast iron on the other hand is slow. Stainless steel is somewhere in the middle and almost immune to corrosion. This is a tri ply pan made in a cladding technique where two stainless steel layers sandwich an aluminum one giving it protection from corrosion and wear and tear. All clad makes use of this technique in all their cookware sets and we’ve compared the brand to Cusinart here. It’s stainless steel interior is immune to damage and you can safely use metallic utensils on it – as long as you dint do stupid things like poking it with a knife. It won’t rust or corrode. However, it will slowly lose the shiny stainless steel exterior with time. Scrub it off and the glow will be restored.
The only downside of this pan is that it doesn’t have a non stick coating. Stainless steel skillets don’t require seasoning as long as you use plenty of cooking oil or sear fatty steak.
Lodge Cast iron grill pan
Do Grill pans offer more than the crispy grill lines we love? I doubt. If you’re more interested in getting an even crispy steak that’s browned to perfection, you’ll gain little value from this pan. This pan makes great looking steak for sure but the taste and crispiness isn’t consistent. Grill pans may `not be ideal for everyone but they do make irresistible-looking steak.
What makes this grill skillet great? It’s quite roomy. You can make enough steak for a medium sized family at ago without batching. Again, it’s a grill pan on one side and has a flat surface on the other. Flip it to make eggs and pancakes. As you would expect with grill pans, it doesn’t have a handle. This makes it somewhat difficult to use.
What are cast iron skillets?
Cast iron skillets are one of the most classic kitchen tools chefs and cooks have access to. They have been around for centuries, and in fact, a cast iron skillet that is well – made and well – taken care of can last for decades, and even centuries. Some cast iron pans in use today have been handed down from a parent or even a grandparent, serving as testaments to their durability and their usefulness.
Cast iron skillets are made of mixed iron and steel, which are melted down and poured into a sand mold, where the mold is broken apart after the metal has cooled, allowing the metal to be formed in the shape of a skillet. Cast iron retains a lot of heat, allowing it to reach very high temperatures, and dissipates heat slowly, meaning that it retains a lot of the heat that it absorbs for a very long time, making it very useful for a lot of cooking methods. In addition, a well – seasoned cast iron skillet tends to be non – stick, making it easy to cook foods in the skillet, as well as very easy to clean. Last but not least, it is a very adaptable cooking utensil, which can be used over a classic gas range, on electric conduction stoves, or even used over coals or fire, or stuck into an oven. The more a cast iron skillet is used, the better it gets, as it develops seasoning layers over time, which lets it become more and more nonstick, making it easier to cook with and easier to clean. As such, it is an incredibly versatile and adaptable tool, which would serve any budding cook very well when put into their arsenal.
Why use cast iron skillets?
Cast iron skillets tend to be intimidating to a lot of people, as the association with them is that they are an advanced cooking tool. Nothing could be further from the truth. Once a cook gets used to caring for the cast iron skillet and making use of it, it will most likely become the most used pan in their kitchen, and for good reason. There are a lot of reasons why a chef may want to make use of a cast iron skillets, and here we will be listing a few of these, but note that there may be even more reasons as to why a cast iron skillet can be used.
Durability
As we earlier stated in the introduction, cast iron skillets are incredibly durable. Being made of a mix of iron and steel (though they are still referred to as cast iron), these skillets are heavy – duty, and it shows on any well – made pan. They tend to be a bit heavier than most pans due to the material, but this material makes it so that these pans do not wear out or break down easily. Furthermore, a well – made cast iron skillet can last generations if treated well and taken care of properly, meaning that a cast iron skillet can be considered an investment, as one of these bought early on in one’s cooking career will probably last the rest of their lives.
Another thing that concerns people is how the seasoning, or the layer of oil that is bonded to the surface of the pan can be made to last. A well – seasoned cast iron skillet that is used often tends to develop a seasoned layer so non – stick that one can even cook eggs on it without the use of oil to prevent it from sticking to the pan, one of the attributes that makes these pans so attractive. However, a lot of people worry about how to maintain the seasoning. A lot of the time, the seasoning of a pan is more durable than people think. As long as one does not scrub it off too roughly, especially if they use metal instruments, then the seasoning will most likely last and improve over time.
Versatility
A cast iron skillet is one of the most versatile cooking implements a chef can have in their kitchen. While most other cooking implements are really specialized, such as non – stick pans being made to be used over a gas range, a cast iron skillet can be used to cook a wide variety of things, and through a wide variety of methods. As stated earlier, cast iron skillets can be used on gas ranges, electric stoves, over open flames or coals, or even in ovens. This means that no matter what type of heat source one is making use of, the cast iron skillet can most likely be used with it, as compared to the limitations of more modern pots and pans, where they are not rated to be used in other heat sources than the ones that they were specifically designed and marketed for.
Cast iron skillets also allow one to cook a variety of dishes. Its qualities of absorbing and maintaining high levels of heat allow for a large amount of versatility in cooking. It can be used to saute, to sear, or even to stew or bake. Thus, cast iron skillets are often used for one – pot dishes, where a dish is cooked entirely in one cooking utensil, even though it may go through multiple stages. For example, if one wishes to stew some meat, they can saute the aromatics in the skillet, then sear the meat in the skillet, then cover it with broth and place it in the oven to cook the rest of the way. This allows for much less cleanup, and requires much less cooking utensils as compared to replicating the same recipe using different pots and pans.
Great cooking results
One of the main reasons people make use of cast iron skillets is due to their capability of absorbing and retaining high amounts of heat, and having that heat be distributed along the pan in a very even manner. This means that one can cook with better results, as there is less likely to be a spot where the heat is concentrated, as well as the fact that as it retains heat so well, adding additional ingredients will not immediately lower the heat level of the pan, which makes adjusting and compensating the heat source far easier and far more effective.
In addition, the even spread of the pan means that it cooks things evenly, which is not only useful for cooking regular dishes, but also for baking and other types of dishes such as stews. When baking, it is important that the whole thing is cooked at a uniform rate, unless one would want a strangely cooked dish. A cast iron skillet solves most of those problems, as it spreads heat far better as compared to one’s ordinary baking dish or pasta pot, which makes it much easier to use, and often returns with better results.
In addition to the fact that it retains and absorbs heat so well, the fact that it becomes nonstick due to its seasoning, which is a polymerized layer of fats (usually cooking oils baked into the pan and the oils that bond to it over time), makes it much easier to cook with. Though it does tend to reach high temperatures, one is less likely to burn food on it, as the food does not stick, and one can avoid getting mangled burnt food, as they can easily be detached and flipped from the pan. This non – stick quality also makes it very easy to clean, as it can simply be submerged in warm water and the bits scraped off with polycarbonate tool or even wiped off with a paper towel.
What to watch out for when cooking in cast iron skillets
Though cast iron skillets are incredibly durable and versatile, there are still some things that shouldn’t be cooked in them for various reasons. The cast iron skillet can cook almost anything, but not everything, because they might harm the pan or its seasoning, and the dish may not come out the way one wants it to.
Acidic Foods
Acidic foods such as foods that contain tomatoes, or even tomato sauce itself should not be cooked in your cast iron skillet. The acidity of the food can end up damaging the seasoning of the skillet, and while a skillet can always be re – seasoned, it may undo a lot of cooking’s worth of layers of seasoning, and one will have to start building up the seasoning again. In addition, due to the damage done to the seasoning, the food that is cooked may taste a bit metallic, due to the acidity chipping away at the seasoning and thus hurting its taste. This means for some classic dishes such as spaghetti Bolognese, it may be better to stick to the stainless steel type skillets instead, in order to avoid doing damage to one’s beloved cast iron.
Wine – Braised Food
One cooking technique that is popular is deglazing the bottom of the pan with wine or vinegar, in order to release the bits that are stuck at the bottom and improve the flavor depth of the dish. However, wine can break down the seasoning of a skillet as well, so before one makes use of this technique, they have to make sure that the pan is well – seasoned before they do it, and they have to make sure to season the cast iron skillet again after, to ensure that whatever layers that may have been broken down will be restored.
Desserts
While cast iron skillets can be used for baking, and in fact are sometimes the primary tools for baking some desserts, one should take care when using the skillet to bake desserts. One of the best things about a cast iron skillet, that it retains a certain amount of “flavor” after cooking foods, can work against it in this case. If a skillet is used most often in order to cook savory foods, it can sometimes keep that flavor and end up influencing the dishes cooked after it. Cooking desserts in a cast iron skillet that has most often been used to cook savory dishes may end up having the desserts taste different, with a certain savory flavor imparted onto it, which changes the dish entirely and will probably be something that the cook wants to avoid. As such, it is better to have separate cast iron skillets when one cooks savory food and when one uses it to bake desserts.
Delicate Fish
While cast iron skillets are very non – stick, there will still be times when some things stick to the bottom of the pan. These are often easily cleaned off, but this also means that the food that is being cooked might not turn out the way one wants it to. Some foods, such as the more delicate fish varieties, may not be well – suited for the high temperatures cast iron skillets reach. Fish such as tilapia or flounder may stick to the pan, and this may ruin the presentation of the food. In addition, a lot of the time, people cook with metal utensils, meaning that when one tries to flip over the fish and scrape it off the pan, they are using a metal spatula, and the action of metal scraping on the pan may damage the seasoning of the pan, lessening the seasoning and the non – stick nature of the cast iron.
How to choose the best cast iron skillet for you
If you are interested in getting a cast iron skillet for your home kitchen, and no one would blame you, it would be tempting to head out right now to the nearest cooking store and pick one up for yourself. However, before you do that, there are still some things that you should know in order to make the proper choice as to what kind of cast iron skillet you’ll be taking home, in order to make sure it suits your needs and lasts you a lifetime. Here we will be discussing some of the things that a buyer should keep an eye out for when choosing the cast iron skillet that they will purchase.
Size
Cooking utensils come in a variety of sizes, and cast iron skillets are no different. There are a large variety of sizes that cast iron skillets come in, but they usually come in four different size points: eight inches, nine inches, ten inches, and twelve inches. An eight inch skillet is good for cooking for two, as it can cook about two chicken thighs or a standard eight ounce steak, and it can be well – suited for cooking vegetables, as its small size lets it easily flip the food that it contains. However, the small size, while making it easier to wield, also means less food can be cooked, so an eight inch skillet is best used for preparing side dishes, or if used for main courses, is best for when the main course is meant to feed one or two people only. A nine inch skillet is similar in function to the eight inch skillet, but the additional inch to its diameter means that it can cook foods that can serve up to three people, maybe four depending on the serving size. When it comes to steak, one of the classic cast iron skillet dishes, it will comfortably fit a twelve ounce steak.
A ten inch skillet is the most conventional one, as it comes the closest to regular pan sizes, as well as replicating popular baking pan sizes as well, making it very versatile in terms of what it can cook and how easy it is for the cook to modify their recipe to suit the pan. It can fit an extra large ribeye steak, or even two large chicken breasts, meaning it can cook enough food at once for a larger amount of people, about three to four servings for the pan.
A twelve inch pan is meant for family – size servings, as it is very heavy and hard to wield, especially if one has become accustomed to flipping food using the pan. However, its size means that it can cook a lot of food, and will be one of the staples in the kitchen when it comes to preparing food, as it is well suited to simply leaving on the counter and cooking with whenever it is needed.
Shape
There are different kinds of cast iron skillets, each with their own purpose. There are generally two types of cast iron skillets that are often seen in the market today: regular, conventional round pans, and griddle pans. Round pans are more versatile, in that they are often used for any dish, and can indeed be used for most dishes, whether it be fried foods, stews, or even baked foods. This would be the right choice if you intend for your cast – iron skillet to be adaptable, or if you are buying one for general use, rather than having a specific type of dish in mind. Griddle pans on the other hand, are pans that can be round or square, but have ridges, where the ribbed surface is better meant for meats. The ribbed surface allows the fats and oils to drain better, as well as allows the meat that is cooked on it to have the criss – cross pattern that is found to be appetizing and attractive. It also allows meat to be seared better as the space in the gaps between the ridges allow the steam to escape, rather than trapping it beneath the meat, making sure that the moisture will not build up, and giving the meat a better seared crust. However, this also means that cook time may take longer, as the meat is only coming into contact with the ridges, and as such, one will have to adjust to longer cooking times. In addition, this also means that cooking with a griddle pan gives one less options, as it may not be suited to cooking some foods such as stews, or for baking desserts.
Brand
Most cast iron skillets on the market today are from popular brands such as Lodge, and these can be very inexpensive. Being relatively cheap does not necessarily mean that they are low quality, and a lot of inexpensive cast iron skillets can still last multiple generations. However, one has to make sure that they are buying a reputable brand, as well as find out what kind of skillets that brand is known to make. For example, if one wishes to by an antique skillet, such as a Griswold skillet, that brand is well known to have thinner, lighter bottoms, allowing it to heat up much quicker and is easier to handle, but at the trade off of having lower heat retention. In addition, each brand may have different methods of making the skillet: the aforementioned Griswold skillets have very smooth surfaces due to the manufacturing methods, and Lodge skillets tend to have rougher surfaces due to fine sand molding being banned for safety reasons. Doing one’s research into their skillet brands can help one make a better, more informed decision. After all, one wants their skillet to last a lifetime or even more, so making sure that they are buying a reputable, trustworthy skillet is very important to getting one set on the journey of using cast iron.
Types of Steak
Choosing the type of steak is one of the most important factors to consider when buying the perfect steak for your meal. There are many different types of steak and picking the right one will depend on your budget, what you want to do with it and how many people you are serving.
The most common types of steak are Rib eye, Strip, T Bone and Sirloin, but there are other steak types to consider as well. Below is a description of each type of steak.
Rib Eye – Rib eye steaks, sometimes referred to as the Delmonico, are known for their marbling. Rib eyes are a popular choice because they have marbling throughout the steak and the result is a very tasty and tender steak. Another reason that the rib eye is a popular steak is because they are typically one of the most affordable when it comes to steak options. Rib eyes can be cut with a bone or be boneless.
Strip – The Strip is also known as the top loin steak and is another popular choice. Strip steaks are cut from the loin, have less marbling than a Rib eye but are still a very tasty steak. Strips can be cut thick and are often priced slightly higher than a Rib eye. Strips can have a bone or be boneless.
T-Bone – T-Bones steaks are actually two steaks in one that are separated by a t-shaped bone. The larger piece of meat is a strip and the smaller piece on the other side of the bone is a tenderloin. T-Bones are typically more expensive because they contain two of the higher priced cuts of meat – a strip and a tenderloin. However, in grocery stores, you may find them at a fair price overall because the steaks are often sold in sizes much smaller than what you’d find at a steakhouse.
Porterhouse – A Porterhouse is similar to a T-Bone but it is cut with a larger filet.
Sirloin – Sirloins are a tougher steak and consists of many different cuts of meat. For steak, Top Sirloins make a better choice whereas other parts of the sirloin are better used as roasts. Sirloins are lower in price.
Flank Steak (often referred to as London Broil) is cut from the bottom of the cow and is a tougher meat. London Broil is not the actual name of a cut but rather a method of cooking. These steaks are best when grilled and then cut into thin strips, across the grain. Flank steak is used for fajitas.
Round Steak – Round steaks are tough and do not yield great results when grilled. These steaks are better used when cooked slowly with liquid that helps to tenderize the meat.
Flat Iron or Top Blade Steak – Believe it or not, this is a newly created steak developed not by evolution, but by better cutting techniques. It is uniform in shape and has plenty of marbling so it’s a great steak for grilling.
Chuck Steak – Chuck Steak is a low cost version of a rib eye. The chuck is a decent steak but it can dry out quickly.
Filet Mignon – The filet is an expensive cut of meat. It is tender but it does lack marbling so it is often cooked while wrapped in bacon. As the steak cooks, the fat from the bacon will help to provide flavor to the steak.
The Right Steak for Your Occasion
So, now that your head is full of all of this information, you’re probably still asking yourself, “How do I pick the perfect steak?” The section below describes the most common events where steak is served and the steaks that work well on those occasions.
Everyday Cooking
Rib Eyes, Sirloins and Strip Steaks are great for everyday cooking. A few of these steaks, mix or match, will please everyone in the family. Sirloins are the most economical in price and the top sirloin is the best bet in the sirloin family. Rib eyes are known to be the steak of choice since the marbling creates a very juicy and flavorful meat. Plus, rib eyes are also moderately priced. Strips are a bit pricier than rib eyes but are a good choice because they are tender and cut to the perfect size.
All three steaks of these steaks possess inherent flavor so, as you will see in the seasoning section, there is not a lot of other work needed to create the perfect steak from these types.
Backyard BBQ
For a large crowd, sirloins will do the trick. They are economically priced and produce a very good flavor. If it is a smaller crowd you can turn it up a notch with Rib Eyes.
Dinner Party
With a small gathering, a boneless strip steak is perfect. Boneless strips offer a great, flavor and you can impress your visitors by offering a very tender steak. Strips are also the perfect size for entertaining as they are typically cut in a 10-12 ounce size. Add a baked potato and vegetable and you have a perfect meal for entertaining close friends or family members.
Elegant Dining
For those special occasions a Filet Mignon is the perfect choice. Filets are the most tender of them all to the point where they melt in your mouth. You will pay for this because filets are expensive because the supply is low. The filet is cut from a very small muscle that is rarely used. This is the reason why they are so tender.
T-Bones and Porterhouses are also excellent choices for a special evening. These steaks are actually two steaks in one, separated by that familiar T-Bone. On one side you have the tender filet and on the other, the strip. The Porterhouse is similar to a T-Bone but cut with a larger filet.
Large Gathering
Since steak is a pricey meal, Sirloin is a great choice for a large gathering. Sirloins are economical in price and they produce a great steak sure to please everyone.
Tailgate
Rib Eyes are ideal for a tailgate party. The marbling will create that great flavor that everyone loves.
Thickness of Your Steak
After choosing your steak and insisting on the right grade, the thickness of a steak plays a prominent role when it comes to the cooking process and the results. Obviously, a steak that is thin will cook very quickly while a thicker steak will take longer to cook.
A good thickness for a steak is one and a quarter to one and a half inches in thickness. Avoid steak cuts that are thinner than an inch. A steak that is an inch or less in thickness leaves little margin for error as it is prone to over cooking.
Because the steak is thinner, the heat from the searing process will cook the inside more quickly. It is more challenging with thin steaks to accomplish the perfect level of pink in the middle or tenderness that most steak lovers desire.
On the other hand, a steak that is two inches or thicker will be prone to undercooking. The outside will be done but there is a good chance the middle of that steak will still be red. People that like rare or medium rare may enjoy thicker steaks, but for the great majority of steak lovers, a steak that is very thick will affect the overall quality of the steak once cooked.
Supermarkets typically sell their pre-package steaks with thickness less than one inch and closer to three quarters of an inch. Warehouses and specialty markets typically package their steaks with a thicker cut. Just ask the onsite butcher to cut your steaks to your specification. It may cost a bit more than the pre-packaged offerings, but you will get better results.
Quick Summary of Best Practices for Buying the Perfect Steak
In summary, when you go to buy your steak, you should not take short cuts. First, insist on shopping for your steak at a store that is known for having a fresh supply and a wide variety of steaks. Second, before you get to the store, decide on the type of steak you want for your meal. And third, keep these best practices in mind:
- Buy the best grade that you can afford. Prime is very pricey but cuts in the Choice and Select group still produce a great steak.
- Look for steaks that are bright red in color, have marbling throughout and are firm to the touch. Avoid deep red colored steak and clumpy marbling.
- Buy from the butcher’s case instead of the pre-packaged meat case. Steaks cut by butcher are typically fresher and of better quality.
- Take Advantage of Your Local Butcher and his expertise. Remember that most grocery stores have an onsite butcher but very few customers take advantage of their expertise. The butcher can answer any questions you may have, offer tips and cut steaks to your exact specifications.Now that you have your steak, let’s discuss steak preparation!
Steak Preparation for Perfection
There are really three essential steps to steak preparation: steak temperature, drying the steak and seasoning.
Temperature of Steak Prior to Cooking
The first key factor in the steak preparation process and a secret key to cooking a great tasting steak is to bring the steak to room temperature before cooking. Many people do not do this but, believe me; this makes a huge difference because it optimizes the cooking process.
In order to do so, you want to take the meat out of the refrigerator at least thirty minutes before cooking. Obviously, if the steak is thicker you may need more time. Doing so will help the meat cook evenly during the cooking process and allow you to achieve better results cooking the meat to the desired doneness.
Steak cooks best on high heat. The heat will sear the outside and seal in the juices. If a steak is cold when put on the grill, the outside of the steak may look done but the inside could still be too red or pink for your liking.
Drying the Steak
Another key element to the perfect steak is to pat dry the steak with paper towels prior to seasoning and cooking. Many cooks skip this step. It only take a few minutes but doing so will create a dryer surface on the steak. A dryer surface will help to achieve the highly desired exterior crust on the outside of the steak when cooking. Conversely, a steak with a wet surface may cause the steak to steam which is not desired.
While you are waiting for your steaks to get to room temperature, you can work on the other dishes that you plan on serving with your steak. You can also use this time to turn on the heat source or light the grill. If you are grilling or broiling your steak you should give the grill or oven about 15-20 minutes to get hot enough to start cooking.
Seasoning
The best seasoning really depends on the type of steak. This section will be split into two parts. The first is seasoning a steak such as a Rib eye, T Bone, Strip, Filet or Sirloin that you can just season with dry spices and cook it.
The second section deals with steaks that work better with a marinade which consists of wet and dry ingredients. Of course, you can marinate any type of meat. Just follow the directions for the marinade (particularly the length of the time needed).
If you purchased a good steak using the factors noted above, there is very little seasoning needed because the marbling (i.e. fat) will break down during the cooking process and make its way through the meat.
In other words, if cooked properly, the heat liquefies the fat and the fat makes its way throughout the steak. This process cannot be beat when it comes to ideal steak flavoring. This is why a steak with more marbling throughout it will have more taste than one with less marbling or one with marbling that is not evenly distributed.
Put simply, if you’ve bought a good quality steak, all you need is salt and pepper. As the fat melts it will carry the seasoning throughout the steak. So, simple salt and pepper works well. In fact, including too much seasoning or introducing other types of seasonings can actually negatively affect the flavoring.
When it comes to salt, I recommend kosher or sea salt to bring out the best flavoring in the steak. If you don’t have either of these, table salt will work well also. Some chefs claim that salt inhibits the ability to sear the steak, which is a key component in cooking a juicy steak. However there are others that refute this notion. As with anything, moderation is key.
For pepper, the best method is to use a pepper grinder. Pre-packaged pepper tends to lose its flavor during the cooking process. Freshly ground pepper will maintain its flavor much better as the meat cooks.
My research has shown that the great majority of people like their steak best in its natural state with minimal spices added because other types of spices can compete with the steak’s natural flavoring. However, there are numerous commercially made steak spice mixes available which offer a different steak experience.
Most of these can be found in any supermarket in the spice aisle. You may find more exotic flavors in specialty markets. You do need to be careful because many will actually create a fake or processed taste. Insist on a high quality spice.
I like my steak au natural, but every now and then, for something different, I will use an additional spice. One of the most popular brands of spices is Montreal Steak Seasoning. Their spice product work with the natural flavoring of steak.
In addition to salt and pepper, Montreal Steak Seasoning also includes dill, garlic, coriander and red pepper.
If you are going to use a spice or dry rub, the steaks that do best for this include: Filet Mignon, Strip, Porterhouse, Rib eye, Sirloin, T-bone, and Tenderloin.
Marinades
A marinade is a combination of wet and dry ingredients. Commonly used wet ingredients include Worcestershire, teriyaki or soy sauce, wine, olive oil, lemon or lime juice. When combined with dry spices such as salt and pepper and garlic or ginger marinades help to add flavor and increase the tenderness of the steak. Marinades work great with tougher cuts of meat such as round, skirt, flank and chuck. They can also be used with rib eyes, strips and t bones.
Whatever ingredients you use, be sure to follow the instructions in your recipe. The time needed to marinade depends on the cut of steak. Tougher steaks need longer marinating times while more tender cuts may need as little as fifteen minutes to a few hours. Be sure to pat dry the steak with paper towels prior to cooking it.
Steak Sauces
Just like spices, there are many commercially produced steak sauces available at most supermarkets. While the marketers would make you believe that eating a steak with steak sauce is essential, most steak experts and true steak lovers will scoff at the notion of using such a thing.
Buy a good quality steak, prep it properly, season it lightly and cook it the right way and you won’t need to add any flavor. It’s like that old saying goes, “You can’t screw up a good steak!”
Oil or Butter
Some recipes will instruct you to coat the steak in melted butter or oil prior to cooking and seasoning. This may be helpful with a less tender steak. However, with tender steaks the added cooking agent will negatively impact the texture of the steak and not achieve the desired results. The goal of this is usually to seal the outer layer. But, a dry outside is the better approach to create the crust on the exterior of the meat. Since a tender steak will have plenty of marbling, it will create its own oil. There is no need to add oil or butter. Doing so also makes the food more unhealthy.
STEP THREE: Pre-Cooking Checklist
Before we get into the actual steps for cooking the perfect steak, I wanted to talk about three additional things that make a big difference in your cooking success: searing, flipping, and doneness.
Searing
With every cooking method, you will want to sear the steak as the first step. Searing a steak seals in the juices which makes a huge difference in the cooking process.
Plus, searing also gives steak that great crusty surface on the exterior. Combine that with a juicy and tender inside and you have yourself a masterpiece!
When it comes to searing, a clean cooking surface is key because you don’t want anything in between the steak and the heat. With a grill, you accomplish this by always making sure your grill surfaces are clean. If you are using a pan to sear the meat you can add some oil. Be sure to use vegetable oil since it will stand up to higher temperatures.
You need to make sure the surface is hot enough before putting the meat in. Watch the temperature though. If it gets too hot, charring will occur as the meat begins to break down and leaves you with bits of carbon. Charring is not desired as it not only tastes bad but is bad for you as well.
As you will see below, the specific process for searing depends on the cooking method. For now, I wanted to emphasize searing because making sure it is done properly ensures a much better tasting steak.
Flipping A Steak
As you will see with each cooking method, a steak needs to be flipped throughout the cooking process to ensure even cooking throughout the steak.
The secret to flipping is to always use tongs when flipping a steak. Using a fork may pierce the exterior and this allows the juices to escape. As noted, it is essential to keep as much juice flowing inside the steak as possible.
Also, you also don’t want to press down on a steak as that will also press juices out while it is cooking.
If you need to check for doneness, use an instant read thermometer. An instant read thermometer is a worthy investment since it will provide you with the internal temperature of the meat without affecting the cooking process. If you do not have one, then cut a small piece off of the steak to check. Avoid piercing at all costs.
Determining Doneness Ahead of Time
The term “Doneness” refers to how cooked the steak is. The terms range from “Raw”, or uncooked, to “Overcooked”. There is no ideal doneness level. It totally depends on the eater and his or her preferences. Steak lovers come at all levels.
Having said this, the doneness level significantly affects a person’s satisfaction with his or her steak. Accordingly, always ask the people who you are cooking for what their desired doneness is. And, do this prior to starting the cooking process.
STEP FOUR: COOKING THE PERFECT STEAK
Okay, now that you understand the importance of searing, you have proper tongs for flipping and you have determined the doneness you need for each piece of steak you have, it is time to cook!
There are four main ways to cook a steak – Grilling, Broiling, Roasting and Pan-Frying. Hands down, grilling will yield the best results due to the high direct heat. If you have access to a grill, either charcoal or gas, you should always grill the steak.
For those that don’t have access to a grill you can still get great results by broiling, roasting or pan frying your steak. Each method is discussed below.
Tip: No matter what method of cooking you choose, do not crowd the steaks on the cooking surface. Make sure there is enough space between each piece of meat. Cooking steaks too close to each other or touching each other may result in steaming the meat and you won’t achieve the ideal searing result.
Grilling
Using a grill to cook a steak is the preferred method because the grill produces the high heat that will sear the side of the meat which creates the desired crust and locks in the juices. A grill also requires less clean up. Using a gas grill or a charcoal grill will give you great results.
Between the two types of grills, most experts believe that a charcoal grill will provide a more authentic, smoky flavor. A charcoal grill will also achieve the hot temperature without a cover. The downsides of a charcoal grill include the time needed to build the fire, no shut off button and the ash waste left over from the burnt charcoal.
Gas grills are the most common because of their convenience. I use my gas grill and get phenomenal results. When gas grills first came to market they were pretty simple with a few knobs and burners and a small cooking area. Now they come in all shapes and sizes with many different features. A gas grill with a large cooking surface and multiple burners (at least 4) is ideal because you can create cooking zones that have different temperatures needed to sear and then finish the cooking.
But if you only have a basic grill without this feature, it is not necessary; just make sure you reduce the temperature after searing.
Gas grills are much more convenient because it takes less time (and materials – no lighter fluid) to light and they can be shut off by turning a few knobs. Gas grills also produce very little waste.
The one downside of a gas grill is the lack of smoky flavor that a charcoal grill provides. Gas grills also operate best when the cover is closed because this allows the temperature to remain high. But, watch out because leaving the cover on too long can increase the likelihood of charring.
Below is a step by step approach to grill a steak with either a charcoal or gas grill.
Charcoal Grill
Step 1 – Build a two level fire by spreading coals in a single layer over one half of the grill. In the other half, pile the coals up so they are 2-3 inches away from the cooking surface. This side of the grill will be hotter and used for searing the meat. The other side will be used to finish the cooking.
Step 2 – Place the grill rack on the grill and put on the cover. Allow 5-7 minutes for the rack to heat up.
Step 3 – Place seasoned steaks on the higher level of the grill and cook on each side for 2-3 minutes or until well-browned. (Move the steaks to the cooler side if flaming occurs. Use a squirt bottle to put out the flame.)
Step 4 – After the searing process, move the steaks to the cooler side to finish the cooking. Refer to the cooking times chart in the Appendix for the amount of time required based on type of steak, thickness and doneness you desire… Be sure to flip the steak halfway through for even cooking.
Step 5 – Transfer the meat to a platter when done (and go to Step 5 of the Five Step Formula).
Gas Grill
Step 1 – Turn on the grill and pre-heat the grill with all dials at the highest setting. Be sure to have the lid down. Let the grill pre-heat for about 15 minutes.
Step 2 – Keep one side of the grill at the maximum heat level and turn the burner(s) on the other side to medium. This will create the cooking zones needed to sear and finish the cooking.
Step 3 – Place steak on the hot side, close the lid and grill on each side for 2-3 minutes or until well browned (searing).
Step 4 – Move the steaks to the cooler side to finish the cooking. If you have a grill which does not allow for multiple cooking zones, you will need to lower the heat at this point to medium or medium high (for higher doneness levels). Refer to the cooking times chart in the Appendix for the amount of time required based on type of steak, thickness and doneness you desire. Be sure to flip the steak halfway through for even cooking.
Step 5 – Transfer the meat to a platter when done (and go to Step 5 of the Five Step Formula).
Broiling
A broiler is like an upside down grill and is a second best alternative for cooking a steak if you do not have a grill. A broiler is also a good option if the weather has turned colder since a grill may not get hot enough to properly cook the steak. This is more of an issue with gas grills. A word of warning – The broiler may produce a lot of smoke so you may want to open a window and your smoke alarm will probably go off.
Step 1 – Position the oven rack so that it is 4-6 inches away from the broiler. For thinner steaks put it closer, and for thicker steaks position it further away. Pre-heat the broiler AND heat the broiler pan. By heating the broiler pan, this creates the hot cooking surface needed for searing (we discussed earlier.)
Step 2 – Once heated to broil levels, place the seasoned steak on the broiler pan. Refer to the cooking chart in the Appendix to determine how long to cook the steak. Turn the steak mid way through the cooking time.
IMPORTANT: If the steak begins to burn or char, move the steak further away from the broiler by adjusting the oven racks. With broiling, this positioning adjustment is what makes it different than roasting.
Step 3 – Remove the steak from the oven and transfer it to a platter. Go to Step 5 of the Five Step Formula.
Roasting
Roasting a steak is a two step process. It is also a great way to cook a steak without a grill.
Step 1 – Pre heat the oven to 450 degrees.
Step 2- Put a heavy frying pan (cast iron if you have one) on a stove burner and heat to medium-high.
Step 3 – Add enough oil to lightly cover the pan. Place the seasoned steak in the pan and cook for 2-3 minutes or until well browned. Flip the steak and cook the other side for 2-3 minutes or until well-browned. This is the searing process.
Step 4 – Transfer the steak to a cooking sheet. Refer to the cooking chart in the Appendix for cooking times. Be sure to flip the steak half way through.
Step 5 – Transfer the meat to a platter and go to Step 5 of the Five Step Formula.
Pan Frying
Pan frying is a great way to cook more tender and lean cuts of steak such as filets, sirloins and strips. With pan frying, the temperature isn’t as high as broiling so you can cook each side just once, flipping half way through.
A nice bi-product of pan frying are the juices left behind after cooking that can be used to make sauces that you can serve with your steak.
Be sure to use a splatter screen when pan frying because the heat and oil can make a mess. Boneless steaks work better for pan frying because the meat will touch the pan. if you are cooking a steak with a bone, it is difficult to properly sear a bone in steak when pan frying.
Step 1 – Put a heavy frying pan (cast iron if you have it) on a burner and turn the burner on to medium-high. Add enough oil to coat the bottom of the pan. The oil is what is required to sear the steak once the steak is put into the pan
Step 2 – Place the seasoned steak on the pan and cook the steak. Refer to the cooking chart n the Appendix to determine the total cooking time. At the halfway point, flip the steak and cook on the other side.
Step 3 – Remove the steak from the pan and transfer to a platter. Go to Step 5 of the Five Step Formula.
STEP FIVE: The Final Secret Step
So, the cooking is about complete and you can’t wait to dig in. Your family or guests are drooling over the smell. Neighbors are ready to knock down your door because they’ve been forced to inhale the beautiful, distinctive aroma of a steak cooking.
This is where you need to step back and take control. This last step is one that most people overlook.
As a final secret step, you must give the steak time to REST before slicing. I repeat, that this is a must do before not just eating the steak, but slicing the steak.
What does it mean to let your meat rest? Well, think about it for a second. The cold (room temperature) slab of meat you started with was just subject to torture for the last 10-15 minutes.
It was immediately exposed to heat close to 500 degrees. Then it was flipped around a few times. The solid fat has been melted and distributed throughout. Once it is done cooking, the steak needs a bit of time to adjust before you can slice into it. This is called letting the meat rest.
When a steak cooks, the juices of the meat move away from the outside towards the middle. When the steak is flipped, the same thing happens on the other side. As a result, the middle is full of juice while the steak is cooking.
If the steak is removed and cut into immediately at that point, the juice will pour out of the middle of it leaving a lot of flavor on your cutting board or platter. You’ve probably seen this before: a steak on a platter or plate with juices all over the place.
High end steak restaurants insist on this last step. This is often why a steak dinner ordered will take longer to get to the table.
The resting allows the juices to redistribute throughout the meat from the center back into the edges. And this does affect the taste of the steak! In addition to the juice retention, a steak will continue to cook some after you remove it from the heat source.
During this time you can finalize the preparations for the rest of the menu.
The steak resting process is pretty simple.
- Once the steak has finished cooking, use your tongs (never a fork) to place the steak on a platter.
- Cover the platter tightly with the aluminum foil.
- Let the steak rest inside the aluminum foil cover before cutting.
How long the steak rests depends on the thickness, but it should be at least 5 minutes. If the steak is thicker you probably want to let it rest for a few more minutes but no more than 10 minutes or the steak will start to get cold.
Now your steak is ready for the table. If you are cooking a number of steaks for a crowd you may want to cut them into smaller pieces at this time. If each person eating will get his or her own steak then you can place the entire steak on their plate!
With this last step of steak resting, you will have accomplished the perfectly cooked steak!