With the brand having several stand mixers across their product line, it can be challenging picking the right Kitchenaid stand mixer. Their two bestselling models, the Artisan and the pro have a few overlapping features adding on to the confusion.
In this KitchenAid pro vs artisan, we’ll go through their features, how they differ and the similarities they share. At the end, the decision to go for the professional stand mixer will be an easy one.

kitchenaid pro vs artisan: Their similarities
With either, you’ll be able to accomplish the same tasks. In fact, they have a similar visual appearance too. They had competing performance and the only thing that could set them apart was when mixing on a larger scale: Here, the Artisan mixer lagged behind.
They’re both made by a reputable company and with each purchase, you’re sure that the brand is giving you your money’s worth. There are many reasons as to why you should get a stand mixer from a reputable brand. First, they will offer satisfactory customer support. Again, stand mixers are compatible with a bunch of accessories and you’re better off getting a unit from a popular brand due to availability and compatibility of these accessories.
Their differences
The professional mixer has a sturdier frame than that of the artisan. Stand mixers are usually a one-off purchase and you’re better off getting a unit that will possibly outlive its usefulness. Stand mixers accessories need to be replaced once in a while. The professional’s accessories take longer before getting worn out.
This 7-liter KitchenAid professional stand mixer comes with a pouring shield, a feature that the Artisan lacks. In addition to the pouring shield, it beats the Artisan in that it has a stop safety witch too.
OUR TOP PICK

This unit comes in 40 colors and if you’re creative, you’ll go for one that complements your kitchen. Of course, there’s only a slim chance that it will come in the exact shade of red you’re looking for. Your best bet is to get a contrasting one.
Of course, I’m sure aesthetics aren’t your biggest consideration when getting a stand mixer.
Coming with a larger bowl (and a more powerful motor than the kitchenaid classic), this unit is a workhorse. With it, you get to knead more dough.
Even though it’s heavier than most stand mixers with the same price tag, it makes up for this as it kneads heavier dough comfortably. Again, 26 pounds of a stand mixer won’t be too heavy for your countertop but you’ll feel it when lifting the unit to high shelves.
The pouring shield is a perfect fit around the bowl. It comes in handy when you’re adding lighter ingredients like powdered sugar or flour as they tend to fly off the bowl.
The shield ensures that they stay on the bowl making cleaning up a breeze thereafter. It’s worth noting that the pouring shield can be a separate purchase.
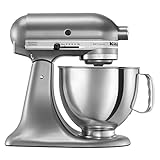
Pros of the KitchenAid artisan
- The bowl makes for easy pouring as it has a handle
- Comes with a pouring shield, flat beater and wire whip
- Choice of 40 colors
- 325-watt motor kneads dense doughs comfortably.
Cons
- Has a premium price tag
- 5-quart bowl isn’t sufficient for large families
- Not the best at kneading large volumes of dense dough
EDITORS CHOICE
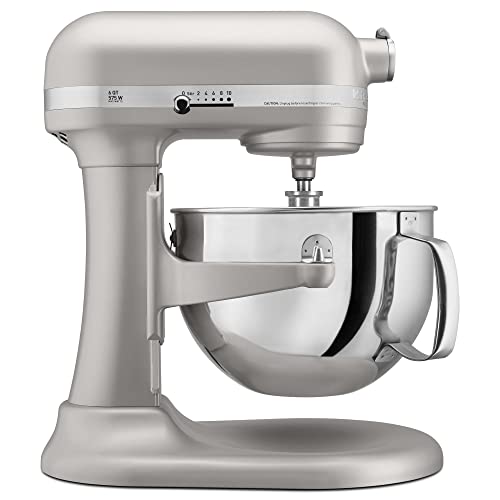
This is a revamped version of the Artisan in that they’ve fixed its flaws. The larger bowl and a powerful motor form a great team.
With it, daily kneading tasks are a breeze and you could even mix batter for 15 cookies at a go. Of course, it has its downsides too with the price tag being dominant. Its three pounds heavier than the Artisan and moving it around is challenging.
If you buy one, the kitchen countertop will certainly end up being its permanent home due to its bulky nature.
Unlike the Artisan that had a tilting head design for pouring, the professional series has a bowl-lift design instead. This mixer is designed for kneading dense dough and a bowl lift de9sgn makes the unit sturdier as no hinges are utilized.
Changing attachments or adding ingredients is still easy. However, these tasks are even easier with the Artisan
Pros
- A handled mixing bowl for hassle-free pouring
- Impressively powerful 550-watt motor
- Large 6-quart bowl for intensive kneading
- Comes with an extra spiral hook for kneading dense dough
- Comes with a pouring shield
Cons
- Not portable due to its bulky nature
- Adding ingredients is slightly harder due to its bowl-lift construction
Tools of the Trade for the Modern Home Bread-Maker
As tools of the manageable home bread-making trade go there are basically two. The first that probably comes to mind is a bread machine. They have their place and I actually relied solely on one for several years. But they have their limits, too, and I think we all agree that while their resulting product is good, convenient, and still better than store-bought, there’s something about it that’s not quite right.
When I was still using my bread machine I ended up just using the dough cycle anyway and then baking the breads and doughs in my oven. So when it broke, it made sense to turn to my KitchenAid® instead (the stand mixer of course being the second of the two tools).
As it turned out this was an even better solution. Not only was the resulting bread better, but I was able to always make a two-loaf batch at a time, something the bread machine could never do. I always needed two loaves, but had to do sequential batches to get them. So in effect the KitchenAid® ended up saving me time overall along with giving me better bread.
Getting Familiar With Your Stand Mixer As Bread Maker
The KitchenAid® Mixer and its many peers are excellent machines capable of performing many duties. With the right fittings and attachments your mixer can be anything from a meat grinder to a ravioli maker. Many of us don’t know the half of what our stand mixers can do, or the most appropriate ways to make them do it (and again, I include myself in this category!
It seems my KitchenAid® always has something new to teach me). In the interest of getting the best results in bread- and dough-making, and in the interest of protecting the longevity of your machine, it’s worth a quick discussion on what the right attachments are to use when making heavy bread doughs.

There are really just a couple of attachments you want to familiarize yourself with for this particular use, and they are all things that come standard with the majority of stand mixers.
The Bowl
Of course you need your vessel, your mixer bowl. The only thing to really know about your stand mixer bowl is that you want it to be able to fit the ingredients for these recipes, which are larger than typical cake and cookie recipes. Most recipes will make two loaves of bread at a time and for that you’ll be using about 6 ½ to 7 cups of flour as a base, plus additional ingredients. The average bowl that comes with a stand mixer is 4 ½ (+) quarts and is equipped for the job. If yours is smaller than this, I’d suggest taking a minute to see how much it can hold (at least measure in 7 cups of flour and make sure it can easily hold that).
Mixing Attachments
What is more important to know is which mixing attachments are the right attachments to use. Using the KitchenAid® as our example (due to its popularity and recognizability), choose the closest attachment for your stand mixer or your specific KitchenAid® model to perform each task.
You will use two different mixing attachments when you make bread and dough. The first attachment you will use will be for the mixing of ingredients and bringing the dough together. For this step I recommend using the flat beater (sometimes called the “paddle” attachment). If you do not have a flat beater with your stand mixer, the dough hook would be a better choice than a wire whip.
FLAT “PADDLE” ATTACHMENT FOR KITCHENAID® MIXERS
(Attachments vary in shape by model, but will look similar to this; use the closest attachment for your stand mixer.)
The flat beater is much sturdier than the wire whip beater and will stand up to the job of mixing heavy doughs time after time. The wire whip will not. It will do the job, but it’s likely to come out of shape once the heavy dough pulls together. It is also very difficult to get the mixed dough out of the wire beater. With the flat beater (or paddle as some like to call it), a few taps is all it takes to remove the bread dough from the beater.
The second attachment you will be using is the dough hook.
DOUGH HOOK ATTACHMENT FOR KITCHENAID® MIXER
(Again, exact size and shape will vary by model; use the closest attachment for your specific mixer.)
This sturdy piece is expressly designed for the task of kneading bread doughs and the like, and it does an excellent job of it. You’ll only use the flat beater long enough to mix and pull the dough together. Once it forms a ball you’ll switch over to the dough hook and let the hook take all the work out of kneading for you.
If you have a splash guard (depending on your model) you may or may not find that helpful as well but it’s not a critical feature, just a sometimes-mess-saver.
That is truly all you really need to know about your mixer and its varied attachments in order to make bread with your stand mixer. As mentioned there are numerous other things that your KitchenAid® and like rivals can do, and those things are fun to explore, too, but for today this is enough. Not so hard, now, is it?
The Basic Method for Basic Stand Mixer Breads
The same basic method is used for all of the recipes because it is the fastest and easiest way to make good homemade bread and it reliably delivers an excellent product. In addition, using one basic method for a variety of recipes makes the life of the baker easier – once you make a few breads and have the basic steps down, you’ll find it easier and easier to prepare fantastic breads in short time. In fact, you’re very likely to memorize your favorite recipe completely!
In simplified terms, the steps of this basic method are as follows:
- combine together all dry ingredients and the fat (butter, lard, oil, etc.), including the yeast
- use very warm liquids and pour into the dry ingredient/fat mixture, then mix through (around 120˚- 130˚F – your hottest tap water in most homes, this being the range recommended for home hot water heaters)
- use the dough hook attachment to knead the bread for about 7 minutes
- let the dough rest for a short period, as per recipe (usually 10 minutes)
- shape the dough into loaves and rise until doubled, then bake
If you are familiar with traditional methods of baking bread, you probably picked up on a few usual steps in the process that are missing. (If you’re not familiar with traditional bread-baking, don’t worry; you’ll have no trouble catching on to this easy stand mixer method!) Those steps include “proofing” the yeast in a luke-warm liquid and an added long first-rise period, followed by punching down, shaping, and more rising. These are the steps that make baking homemade bread a long and involved process. Not necessarily a tedious process (it can be quite enjoyable to make slow foods when time permits), but definitely a process that few people have the time for on a regular basis in today’s very busy world.
The absence of these steps is not a mistake; nor is adding the yeast in with the dry ingredients. When you use this basic stand mixer bread method, you don’t need these extra steps and time. The key is really all in the yeast that is used and its own unique action (more on that in the next section).
What then, is the result? How does this bread compare to other, more traditional baking methods?
To answer that question, let’s first say this: any baking method and any recipe is going to result in something a little bit different. That is, after all, why we have so many different methods and recipes—to serve a different purpose; to create something new; or to ease a process.
That said, you are absolutely sure to be pleased with the results of this faster, easier, basic bread method. The results are comparable to traditional bread baking results, and many people find them to be superior even to recipes they have prepared the traditional way. A lot depends on your personal skill and ability. Some of us struggle with hand kneading and getting it “just right”. A lot depends on how well-suited your home and even your location is to rising and baking bread.
Homes where rising has proven difficult often get a better result from this bread that requires less rising and utilizes a more active yeast to begin with. A lot depends on the time and effort you have available to you for preparing your bread supply—the proverbial “hours in a day”.
It may be the case that you have a really stellar traditional bread recipe, but hardly ever any time to prep and bake it, and so maybe a “nearly” stellar recipe that you can make in minutes on a regular basis really proves to be the better choice.
Even putting all of that aside, this bread method in and of itself has proven to be reliable time and time again, capable of delivering a highly desirable product. When you factor in the fact that your bread is fresh and includes only minimal, reasonable ingredients, ingredients you know, approve, and recognize, and the fact that with this manageable method you can eliminate hidden chemicals and preservatives from your bread, it’s a winning proposition all around.
In the end you have a fast bread method that requires only about 15 minutes of active preparation time (the rest of the time is really just rising and baking while you go on to other pressing things) comparable to quality bakery breads for a fraction of the cost. That makes it very hard to lose.
Troubleshooting the Basic Bread Method
You now know the basic steps to baking bread with this method. It really is a pretty straight-forward and forgiving method; nevertheless bread sometimes can have a mind of its own, it seems, and so it helps to look at some simple tweaks and troubleshooting methods that might make the process that much easier for you.
In many ways making bread can be very “personal” in that the specific factors in your home will differ from those of another, possibly even from your next-door neighbor’s, and so it helps to familiarize yourself with a few of the tricks of the trade that can make the difference. Please note that NONE of this is said to deter you from trying to bake your own bread. Quite the opposite! This is only said to give you a leg-up and help you overcome some potentially small hurdles that can make a big difference in the breads you bake.
When things go wrong with baking bread, it is almost always an issue with the bread not rising well. After that the issues usually have to do with things like structure or falling after rising. If you find the results of a bread batch to be not quite to your liking, there are a few things you can try to do differently:
– First, before doctoring a recipe too much, try the recipe again. It’s surprising what a difference a day can make with bread, and often nothing different needs to be done at all. As you bake bread more often you’ll come to learn the little things that can negatively impact the outcome and you’ll learn to adjust for different circumstances of the day (for example, dry air or cool temperatures). Know that we all have our good days and bad days and in the end you’re out a bit of time and a few ingredients – nothing that should make you give up! If that doesn’t work, try some of these other suggestions:
– Increase the yeast (keep it to a minimum and take care – too fast a yeast action can cause a weak gluten development and structure, and result in falling breads. For these recipes probably no more than ¼ to ½ teaspoon extra).
– Purchase new yeast. Yeast is alive and old or improperly stored yeast can become highly inactive and even die and stop acting completely. If it’s been a while or your yeast was exposed to warm temperatures or humidity, buy new. Store yeast in a cool, dry place, or better yet, in your freezer.
– Change yeast brands. It’s just a fact that some yeasts perform better than others and some brands will prove to be more reliable for you. If one yeast doesn’t seem to be doing the trick, try a completely different brand. (Although I’ve successfully used a number of different brands, my favorite is Fleischmann’s Instant Yeast for these recipes – more on that coming up.)
– Knead more. A dry, coarse bread can result from not kneading the dough long enough, which does not allow the gluten to develop. In theory over-kneading can also cause texture and structural issues, but it’s generally accepted that, practically speaking, neither you nor your machine could or would over-knead a bread dough. That’s not to say you should go crazy with the kneading, but if you need to adjust your kneading time, go to the longer end of the range given (and possibly a minute or two longer).
– Find a better place to let your bread rise. The area where you place your bread to rise should be warm and as draft-free as possible. Cool temperatures retard yeast growth, and too cool a spot or a spot that is open to cool or cold drafts will do the same.
– Be aware of humidity when rising. This is especially an issue in dry winter months or in very dry climates. Yeast likes moisture as well as warmth. When the air is too dry, rising can be difficult. Let a pan of water simmer on a stove burner to humidify the room or consider rising your dough in a warmed oven with a pan of boiled, steaming water on the bottom shelf. (Only warm the oven on its lowest setting and shut the oven OFF before putting the dough in to rise. Do not cover the dough when you rise in the oven – the humidity of the enclosed space will be plenty and can cause a sticky top if covered, which can stick to the cover and cause your nicely-risen loaf to fall. Remove the water pan prior to baking.)
– Sift or spoon your flour when measuring. The major ingredient in your bread dough in terms of bulk is your flour. If you are not sifting your flour or are not spooning it into the cup when measuring, it’s easy to get a dense measurement and therefore too much flour. (Let me admit here, however, that I hardly ever take that much care with measuring the flour in these recipes using this method. The whole point for me is good bread in record time, and these recipes usually forgive my haste. Please don’t tell Grandma!). Still, it’s worth mentioning and worth a try if you’re having troubles. You might even find it’s more of an issue with some flour brands as opposed to others.
– Let your cold ingredients warm up before mixing. This is really a flour issue since it is by far the largest volume ingredient in your bread. A tablespoon or three of cold sugar won’t impact the outcome much, but six cups of flour is a different story. If your flour is stored refrigerated or in a cold pantry or cabinet, let it sit in a warmer room for a little while and warm to room temperature before mixing. It can have a big impact on the activity of the yeast.
– Raise your rising patience level. We all know we can’t control the weather, and sometimes honest-to-goodness weather factors are in more control of your bread dough than you are. We know temperature and humidity have a significant impact, but so, too, can things like atmospheric pressure and storm systems. You won’t be able to fight these factors so control what you can and accept that sometimes you might just need to give it a little more time to rise. Typically with this method 1 to 1 ½ hours will be sufficient (and some recipes, like the French Bread, may rise even quicker than that), but know that rising time is subject to many factors and is variable. Don’t give up on your bread for a lack of patience! Give it some time.
– Decrease rising time. Many things with bread seem paradoxical and just as rising for too short a period can cause issues, so too can letting your dough rise for too long. Over-risen bread will become too gassy and yeasty, affecting both the flavor and the structure. Over-risen bread will stick to the cover, collapse when it is removed, and/or fall by itself and leave you with a dense, flat bread when baked. It’s a simple fix, but do be aware that in the warmer months and in humid weather you’ll want to keep a closer eye than usual as your bread under these conditions can rise much faster than expected or faster than what is written in a given recipe.
– Adjust your expectations and be aware of different rises for different flours. Sometimes what you think is a failure really is not. Refined white flours just make lighter loaves and rise higher than whole grains. In fact, whereas you should rise your white breads to double their initial size, with whole grains you will normally only expect to get somewhere between 1 ½ to 2 times the size. This is not a mistake; it’s just the way of working with whole grains. Relax, experiment, and get to know the recipes you love best.
– Listen to your mother (grandmother, grandfather, baking friend, whomever). This list of troubleshooting tips is by no means exhaustive. You can learn a lot from people with experience, so always keep an open ear and mind for more helpful tips!
– Keep on baking! When it comes down to it, who cares if a loaf or two goes awry? We all have “those days” and the best way to overcome them is to just try again. You’ll find this method and these recipes to be pretty forgiving and well-performing, but there is actual science to becoming more successful by baking bread more often – a kitchen where bread is baked more regularly becomes more conducive to successful bread baking. The more bread you bake, the more wild yeasts that will be in your kitchen, and those will only help make your environment friendlier to bread baking as you go along. Good news!
Longevity and Life Factors for Stand Mixer Breads
One thing people typically want to know when baking their own breads is, How long will it last?
We all know that the plastic-packaged breads on a store shelf are far from freshly made by the time they reach their point of purchase, including many bakery and “homemade” versions. The way these breads are kept soft, palatable, and fresh is to add things like preservatives and dough conditioners.
The entire point (or a very large factor in it, at least) of making your own homemade bread is to avoid these extra, questionable chemicals. And so, we simply cannot expect that we will get the same shelf life out of a cleaner, simpler, homemade bread.
Ideally, the perfect time to eat most homemade breads is about a half an hour after they’ve come out of the oven while still warm enough to melt a pat of creamy butter. But that’s just spoiling ourselves (but do go ahead—indulge!!). Understanding this and all those factors previously discussed, all the breads will hold up quite well over a course of days.
Under good storage conditions (cool, dry, preferably not refrigerated), these breads will still impress after two or three days with little noticeable difference. When not challenged by environmental conditions (like high humidity and high temperatures), these breads will be clean and consumable for as long as a week (with some loss of moisture and texture, as is to be expected).
As we see with store-bought breads, the shelf life of your breads will be determined by those environmental factors mentioned here and that also means that the life and longevity of your breads might even be different at different times of year (for many of us with changing seasons, it certainly will be).
Either way, even under the worst storage conditions you can generally expect your bread to last well for at least two days. Fortunately these recipes are easy enough to prepare while you are in the kitchen making dinner or attending to other matters, and so even during the times of year when storage might be more of a challenge for you, mixing and kneading a couple of good, fresh loaves will be easy enough for you to do as needed.
After all, that’s the point – to be able to have excellent, healthy bread virtually on-demand.
ASSEMBLING YOUR TILT-HEAD MIXER
To Attach Bowl
1. Turn OFF the stand mixer.
2. Lift or tilt the motor head back and place mixer bowl onto bowl clamping plate, turn clockwise to secure into the stand mixer.
To Remove Bowl
1. Turn OFF the stand mixer using the speed control.
2. Lift the motor head back and remove the mixer bowl by turning counterclockwise.
To Attach Basic Attachments (Flat Beater, Wire Whip, Or Dough Hook)
1. Turn OFF stand mixer using the speed control.
2. Tilt the motor head back and insert choice of beater onto beater shaft.
3. Press upward and turn the attachment to the right to secure it into the motor head.
To Remove Flat Beater, Wire Whip Or Dough Hook
1. Turn OFF by pressing the speed control to OFF.
2. Tilt the stand mixer motor head up. Press the attachment slightly up and rotate to the left. Then allow attachment to slide off the base.
To Lock Motor Head
1. Tilt motor head and push down to make sure that it is completely down.
2. Position the locking lever to LOCK position.
3. Test if already locked properly by trying to lift up the motor head.
To Unlock Motor Head
1. Turn off stand mixer using the control guide.
2. Position lock lever to UNLOCK position and lift up the motor head.
NOTE: Make sure that the stand mixer motor head is always locked when using the stand mixer.
SPEED CONTROL GUIDE
Stir Speed
This speed is used for slow stirring, mashing and combining different ingredients like incorporating wet to dry mixture, or vice versa. It is also used in combining meats with other ingredients and making homemade ice creams.
Speed 2 – (Slow Mixing)
This speed is used for kneading yeasted dough mixtures, slow mixing, mashing ingredients and stirring mixtures slowly. It is used in stirring and mixing mixtures like heavy batters and sticky candy mixtures.
Speed 4 – (Mixing)
This is also the medium speed and the right speed to use in semi-heavy batter mixing like cookie mixtures, folding sugar into meringues and egg whites and combining shortening and sugar. Attachments like the Slicer or Shredder, Food Grinder, Fruit and Vegetable Strainer and Sausage Stuffer also use this speed.
Speed 6 – (Beating)
This is the recommended speed in beating ingredients like finishing the mixing of cake batters and creaming ingredients such as butters and shortening. The Pasta Press and Citrus Juicer are also used with this speed.
Speed 8 – (Fast Beating)
This is appropriate for incorporating air into the mixtures like whipping heavy cream, egg whites and frostings.
Speed 10 – (Fast Whipping)
This speed is used in quickly whipping small amounts of cream and egg whites and can also be used with the Grain Mill and Pasta attachments.
STAND MIXER ATTACHMENTS AND USE
Your stand mixer comes with 3 basic attachments; the flat edge beater, the wire whip and the dough hook attachment. These attachments have different uses in preparing recipes and some recipes will require specific attachments.
BASIC ATTACHMENTS
Flat Edge Beater
This attachment is an all-purpose tool, but mainly for baking recipes and mixing ingredients in general. This attachment can be employed on all speeds and used for mixing light or heavy mixtures.
Use this attachment in mixing normal to heavy mixtures:
- Cakes
- Biscuits
- Quick Breads
- Candies
- Meat Loaf
- Cookies
- Mashed Potatoes
- Pie Pastry
- Wire Whip
This attachment is used to increase the volume of various mixtures by incorporating air in it like whipped cream frosting recipes, and light icing mixtures like meringue, emulsified ingredients like mayonnaise and even for your omelet recipes. It is recommended to use this attachment for faster speeds.
Use wire whip attachment for these types of recipes:
- Heavy Cream
- Mayonnaise
- Boiled Frostings
- Whipping Eggs
- Sponge Cakes
- Angel Food Cakes
- Some Candies
- Dough Hook
This attachment is specifically for kneading dough mixtures for breads, especially for yeast dough. It reduces the amount of kneading time and is more convenient and faster than traditional kneading by hand. The result is almost similar and rising limitations is just about the same. It is recommended to use SPEED 2 for the attachment.
Mixtures for dough hook mixing and kneading:
- Breads
- Coffee Cakes
- Rolls
- Buns
SPECIAL ATTACHMENTS:
Aside from the basic stand mixer attachments, there are also special accessories and attachments that can be purchased for many stand mixers. These attachments aid in making daily meal prep much easier and faster. Some of these attachments make home prep of your own ingredients something that is simple and attainable. A few examples are flour, pastas, ground meat patties and sausages, pureed fruits and vegetables, homemade ice cream and many more.
Pasta Roller
This attachment is essential when you love eating homemade pastas. Freshly made pastas add a distinct taste and flavor to your favorite pasta dishes. Recommended speed for this attachment is SPEED 8 to 10.
Pasta Extruder
This attachment is used after passing the pasta dough into the rollers. The stand mixer is then attached with a mold of different shapes for making spaghetti pasta, macaroni, fusilli, fettuccine, angel hair and rigatoni. Recommended speed is SPEED 10.
Ravioli Maker
With this attachment, you can simply make homemade ravioli and cook them right away in your own kitchen. It also allows using the desired filling to be added in your freshly made ravioli. The pasta dough must be dusted first with flour and flattened in the pasta roller before using the ravioli attachment.
Food Grinder
This attachment allows grinding various ingredients such as meats, fruits, vegetables, cheese and nuts. It has a fine and coarse setting to give you the right size and texture of ground ingredients. Grinding your own ingredients and using them right away in cooking dishes will give distinct aroma and added flavor, better than store-bought ground ingredients. Use this attachment in making homemade burger patties, sausage, meatballs and the others. It is recommended to use SPEED 4 in using this attachment.
Sausage Stuffer
This attachment is used with the food grinder housing for making trouble-free homemade sausage recipes. By making your own sausage, you can ensure that the ingredients are fresh and healthy. You can also make different lengths and thickness according to preference and can be prepared ahead for future consumption. It is recommended to use SPEED 4 while using this attachment.
Vegetable Strainer
This attachment purees fresh ingredients such as tomatoes for your homemade sauce and fruits for desserts and pie fillings. Making fresh purees retains most of the nutrients and flavor making your prepared dishes more healthy and flavorful. You can also use this in straining mixtures to separate the solids like skin and the seeds. It is recommended to use SPEED 4 for this attachment.
Slicer And Shredder
With this attachment, you can now prep fruits and vegetables with uniform size and thickness. Thinly slicing potatoes, vegetables and cheese is made easier and faster by using this attachment. It can also be used in grating cheeses and fresh produce. With this attachment, you can now prepare various salads such as chopped salad or even coleslaw. SPEED 4 is recommended for this attachment.
Citrus Juicer
Refreshing beverages, luscious desserts and tasty pastries are prepared with the freshest ingredients that are available. This attachment can help you in squeezing out the juices of citrus fruits easily, while separating out the seeds from small limes to large pomegranates. Freshly squeezed juice from various citrus fruits is an essential ingredient in preparing flavorful recipes like key lime pies, citrus beverages and other desserts. It is recommended to use SPEED 6 for this attachment.
Grain Mill
With this attachment, you can now make DIY flour and cornmeal in your own kitchen. You can have finely or coarsely milled grains depending on the type of ingredient required. By using freshly milled flours, baked breads and pastries become more flavorful and nutritious because most of the grain flavor and nutrients are retained. Not like store bought flour which contains low amounts of nutrients and also with less flavor due to long periods of storage.
Ice Cream Maker
With this attachment, homemade frozen desserts and ice creams can now be prepared quickly and easily without worrying about the texture and consistency of the final product. The constant speed of the stand mixer together with controlled time durations can produce creamy, smooth, light or dense ice creams mixtures. It is recommended to place the freezer bowl inside the freezer 15 hours before making the ice cream. This allows even creaming and thickening of ice cream mixtures. Use STIR SPEED for this attachment.